 Haibin's blog
Frameworks
LLM on CPU 推理流程python源码解析
其他框架解析: vllm 框架解析: LLM 高速推理框架 vLLM 源代码分析 / vLLM Source Code Analysis - 知乎 vLLM: Easy, Fast, and Cheap LLM Serving with PagedAttention | vLLM Blog llama.cpp llama.cpp源码解读--推理流程总览 - 知乎 纯新手教程:用llama.cpp本地部署DeepSeek蒸馏模型 - 知…
其他框架解析: vllm 框架解析:LLM 高速推理框架 vLLM 源代码分析 / vLLM Source Code Analysis - 知乎 vLLM: Easy, Fast, and Cheap LLM Serving with PagedAttention | vLLM Blog llama.cpp llama.cpp源码解读--推理流程总览 - 知乎 纯新手教程:用llama.cpp本地部署DeepSeek蒸馏模型 - 知乎
Source code for pytorch + transformer
import torch from transformers import pipeline import time设置随机种子以确保结果可重复
torch.manual_seed(123)
模型 ID
model_id = “meta-llama/Llama-3.2-1B”
创建文本生成 pipeline
pipe = pipeline( “text-generation”, model=model_id, torch_dtype=torch.bfloat16, # 使用 bfloat16 节省内存 device_map=“auto”, # 自动选择设备(CPU 或 GPU) max_new_tokens=256, # 生成的最大 token 数 )
运行模型生成文本
prompt = “The key to life is” res = pipe(prompt)
输出结果和耗时
print(“Generated text:”, res[0][“generated_text”])
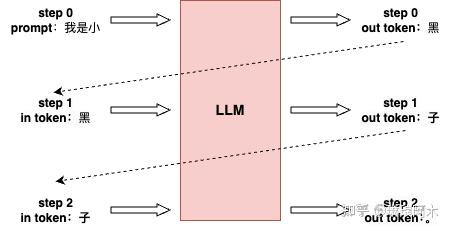
LLM推理首先输入一个预设的prompt,将其传入模型,生成首个预测的token(首字)。随后进入自回归阶段,模型依次利用前一步生成的token,预测下一个token,直至完成整个序列的生成。
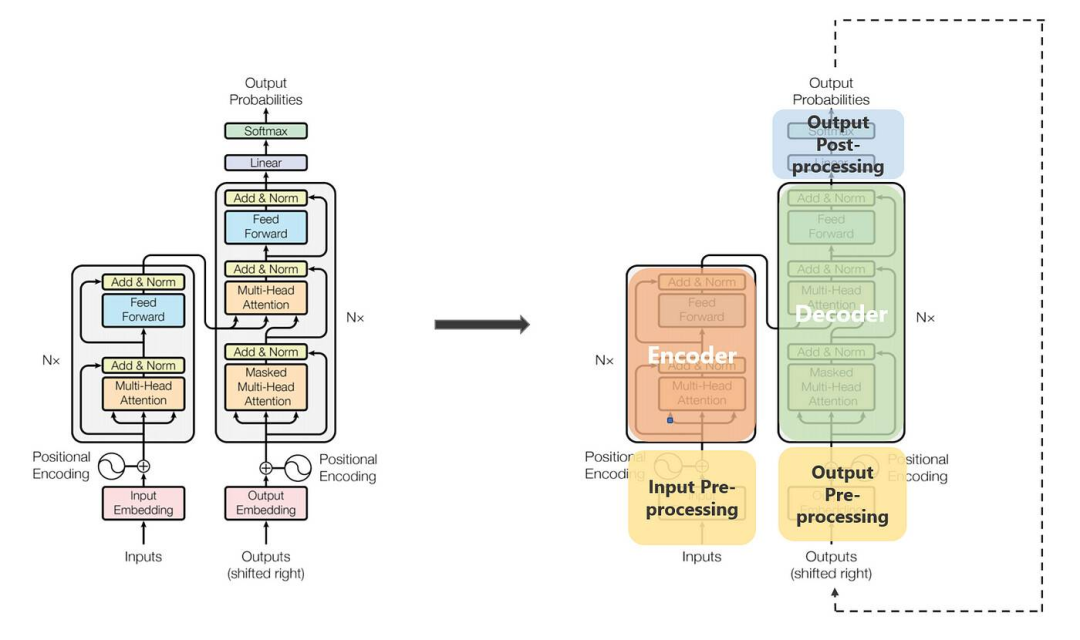
Function stack
使用pytorch profiler进行观察,得到运行图
从prompt和结果那里插入
from torch.profiler import profile, record_function, ProfilerActivity from torch.utils.tensorboard import SummaryWriter # 用于 TensorBoard 日志输入提示
prompt = “The key to life is”
使用 PyTorch Profiler 分析
with profile( activities=[ProfilerActivity.CPU], record_shapes=True, profile_memory=True, with_stack=True, on_trace_ready=torch.profiler.tensorboard_trace_handler(“log_dir”) # 直接写入 TensorBoard 日志 ) as prof: with record_function(“model_inference”): res = pipe(prompt)
输出生成结果
print(“Generated text:”, res[0][“generated_text”])
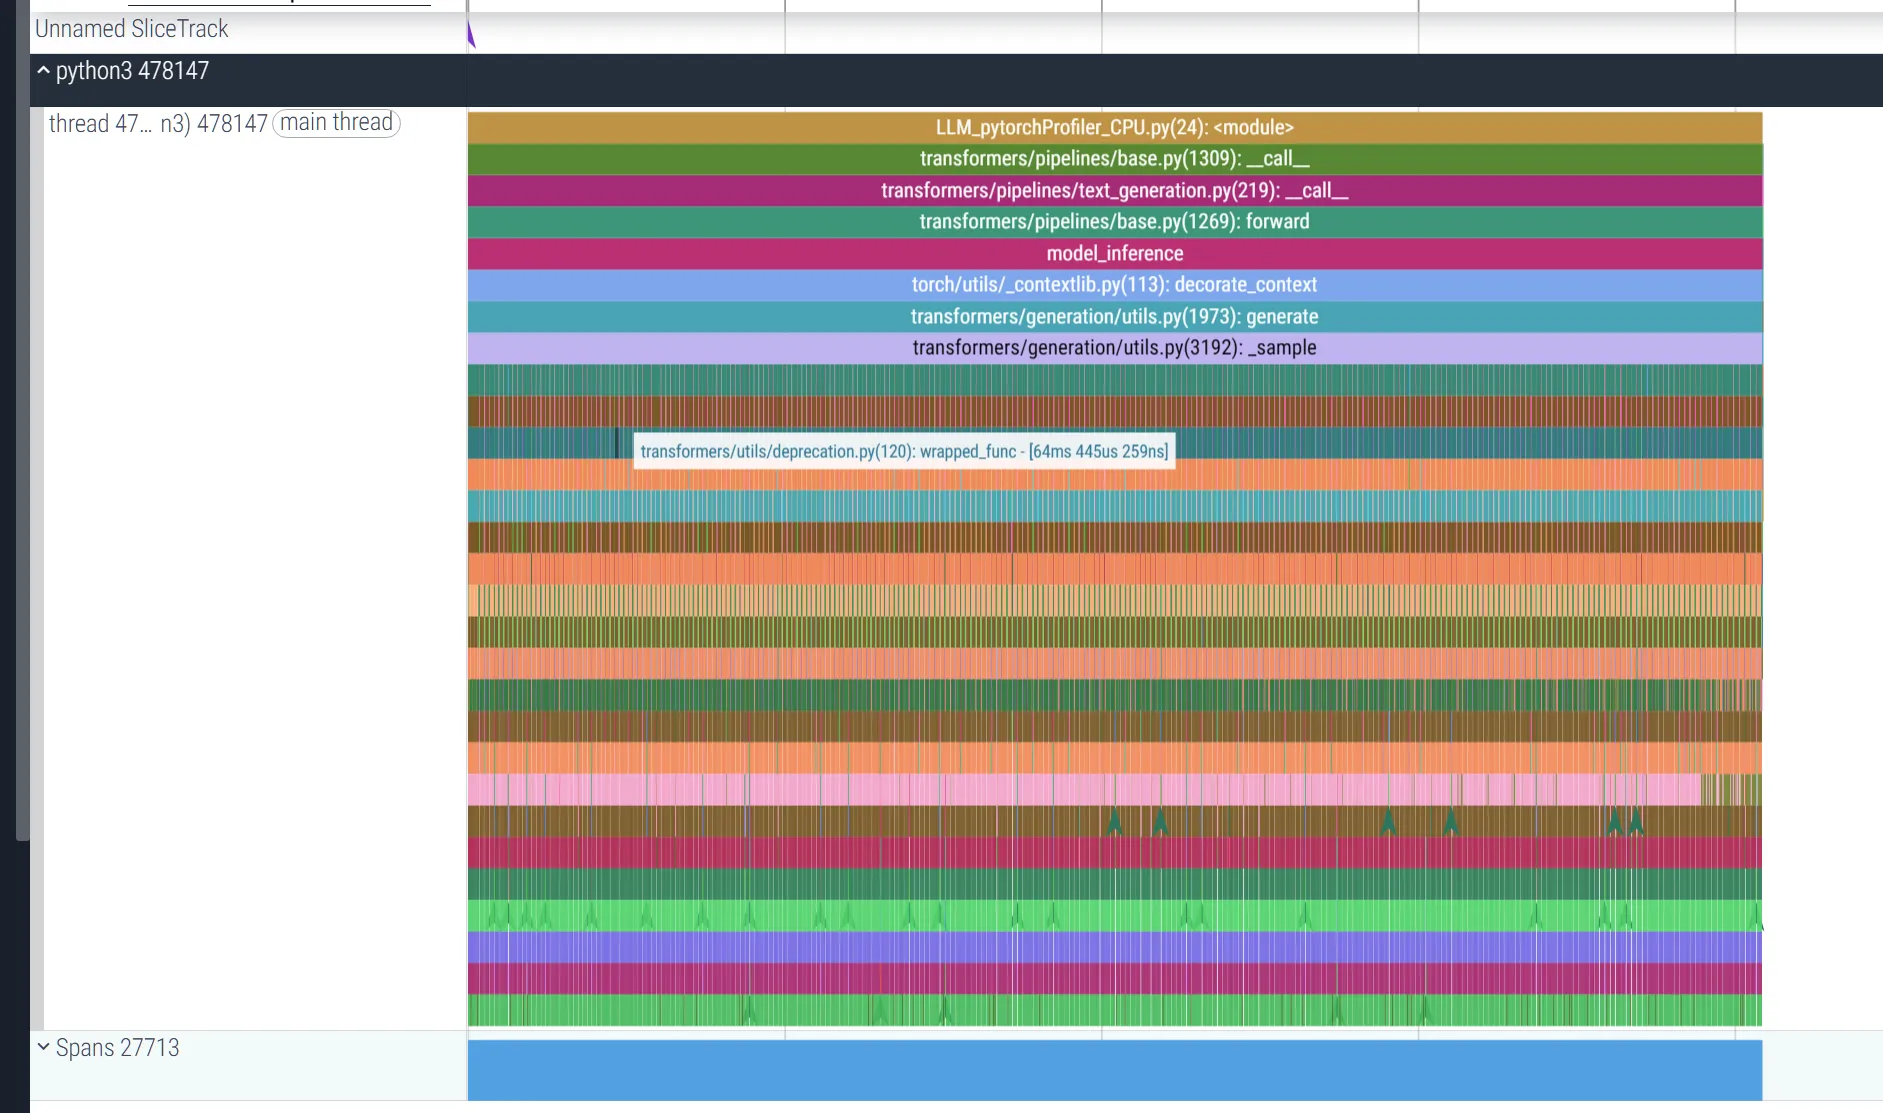
调用栈:从 pipeline.call 开始,依次调用分词器(tokenizer.encode)、生成逻辑(generate)、模型前向传播(model.forward),最后解码输出(tokenizer.decode)。
Output 层与Sample 层
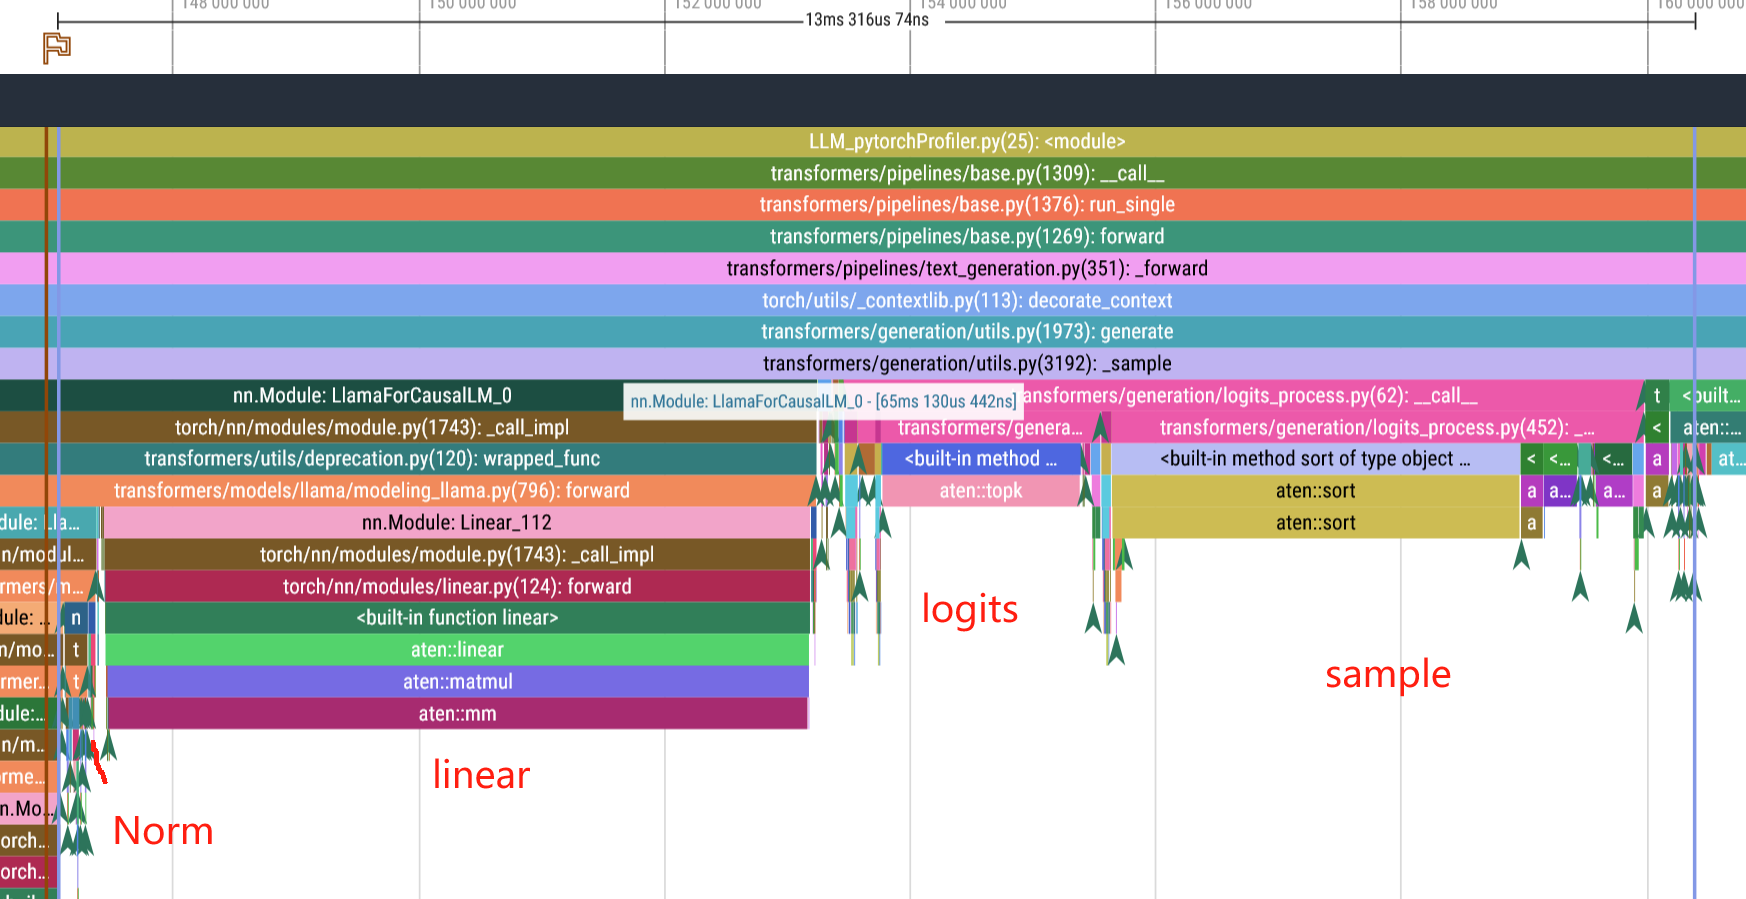
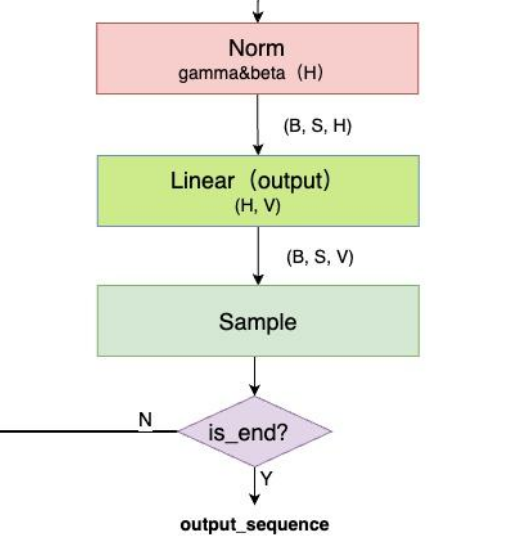
图文详解LLM inference:LLM模型架构详解 - 知乎
-
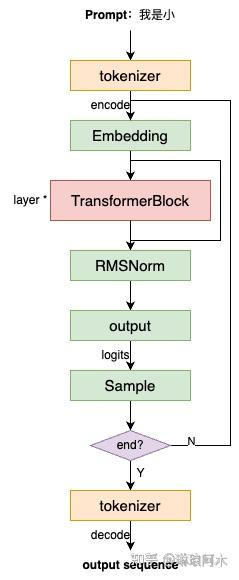
模型接收预设的
prompt作为输入,通过tokenizer对 prompt 进行编码(encode)为输入 token 序列。 -
输入 token 首先经过
Embedding层,转化为高维度的向量表示(通常称为词向量)。 -
接着,这些向量依次通过多层
TransformerBlock,逐层进行特征提取和信息交互,最终生成上下文相关的高维表示。 -
然后,这些表示通过
RMSNorm层进行归一化处理,并输入到Output层,计算出预测的logits。 -
最后,基于
logits对最后一个 token 进行采样,从而得到模型预测的下一个 token。 -
重复上述过程,模型将不断地生成下一个 token,直到生成预设的
end_id或检测到指定的stop_word,从而结束生成流程。
采样(sample) 有Greedy Search、Temperature Sampling、Top-k、Top-p、Beam Search等多种方式
各个block
这里边的transformer block:
TransformerBlock 的核心组件包括两个 RMSNorm 层、一个 Attention 模块和一个 FFN(前馈神经网络)模块,其计算流程如下:
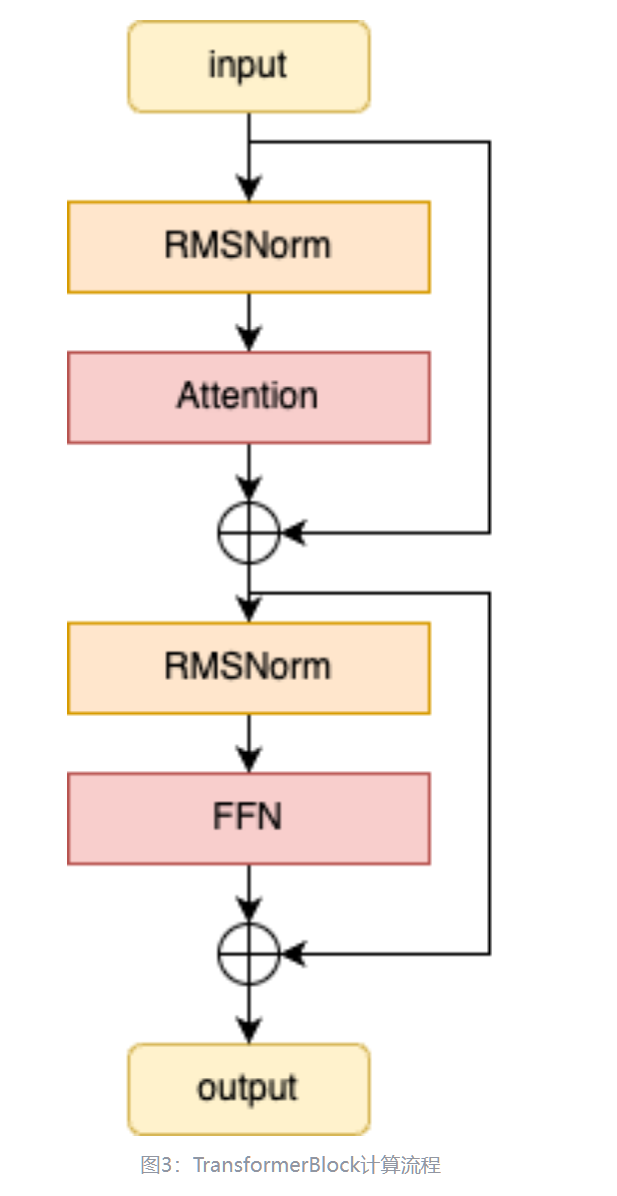
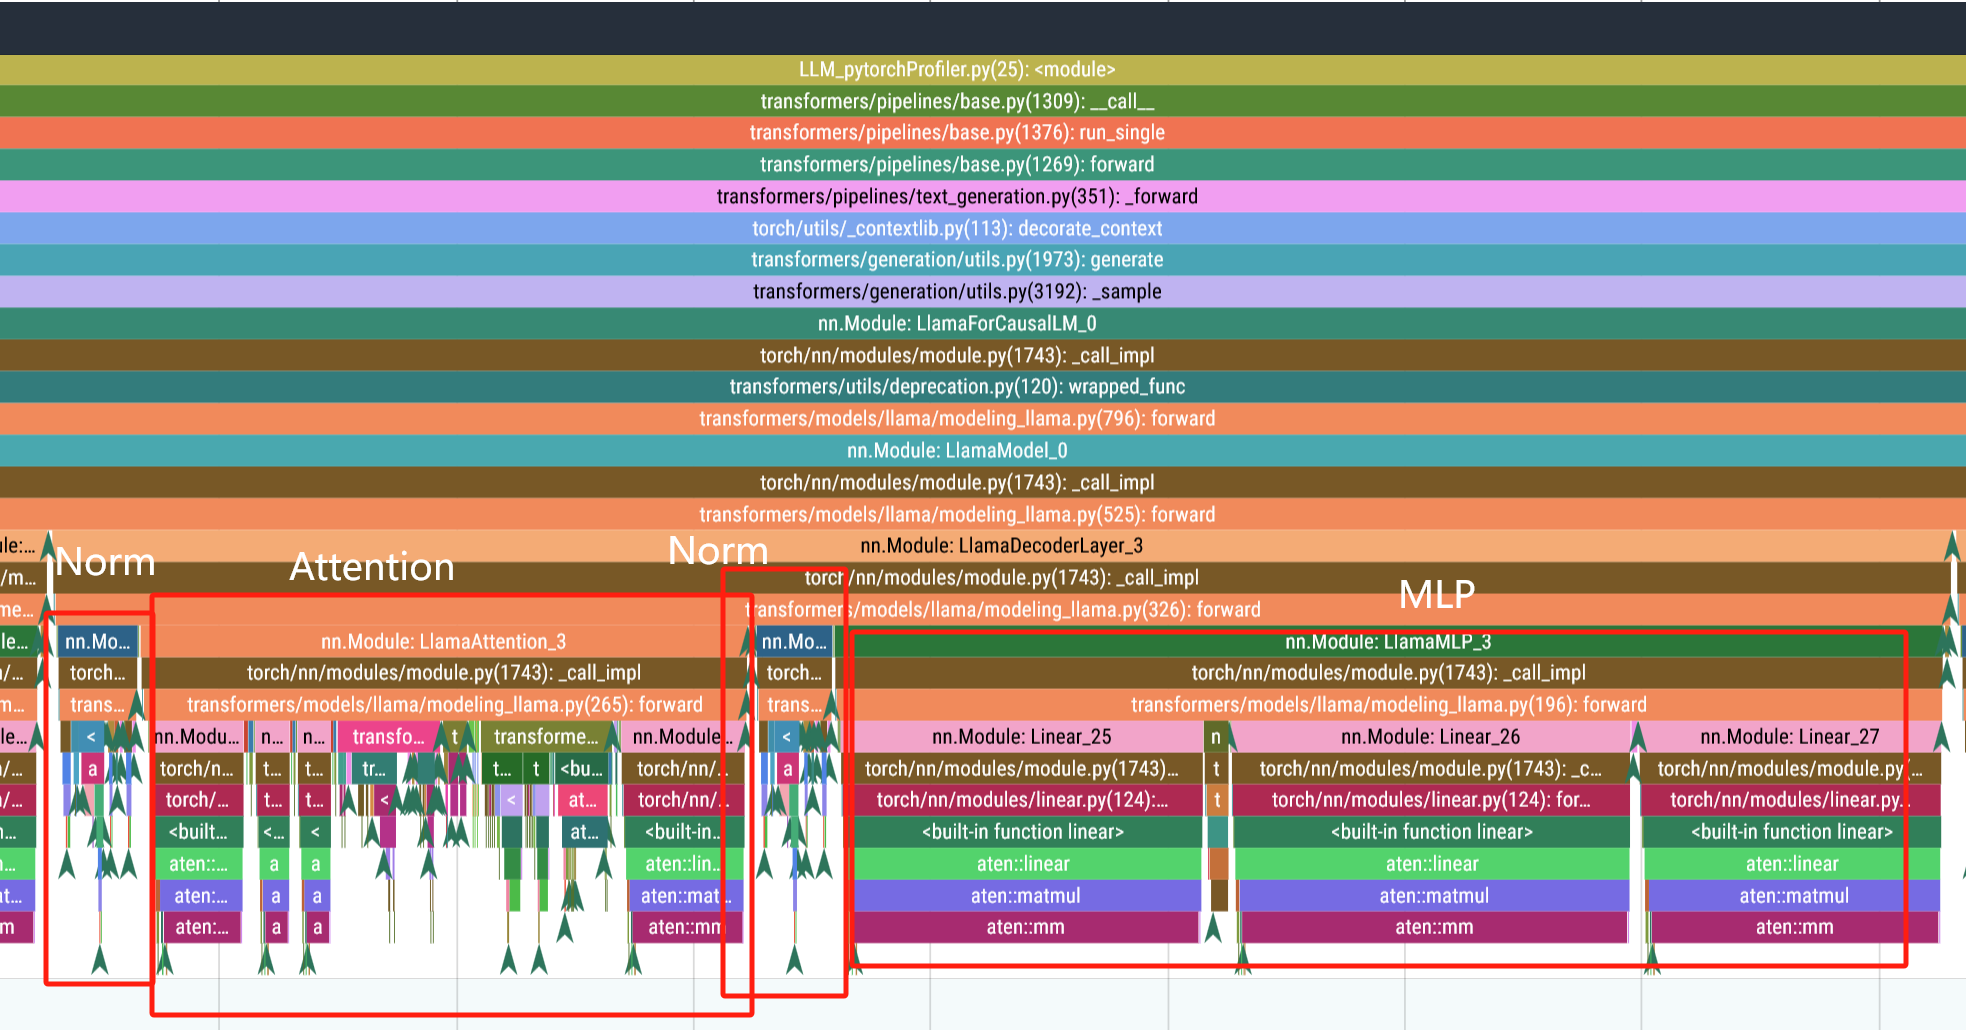
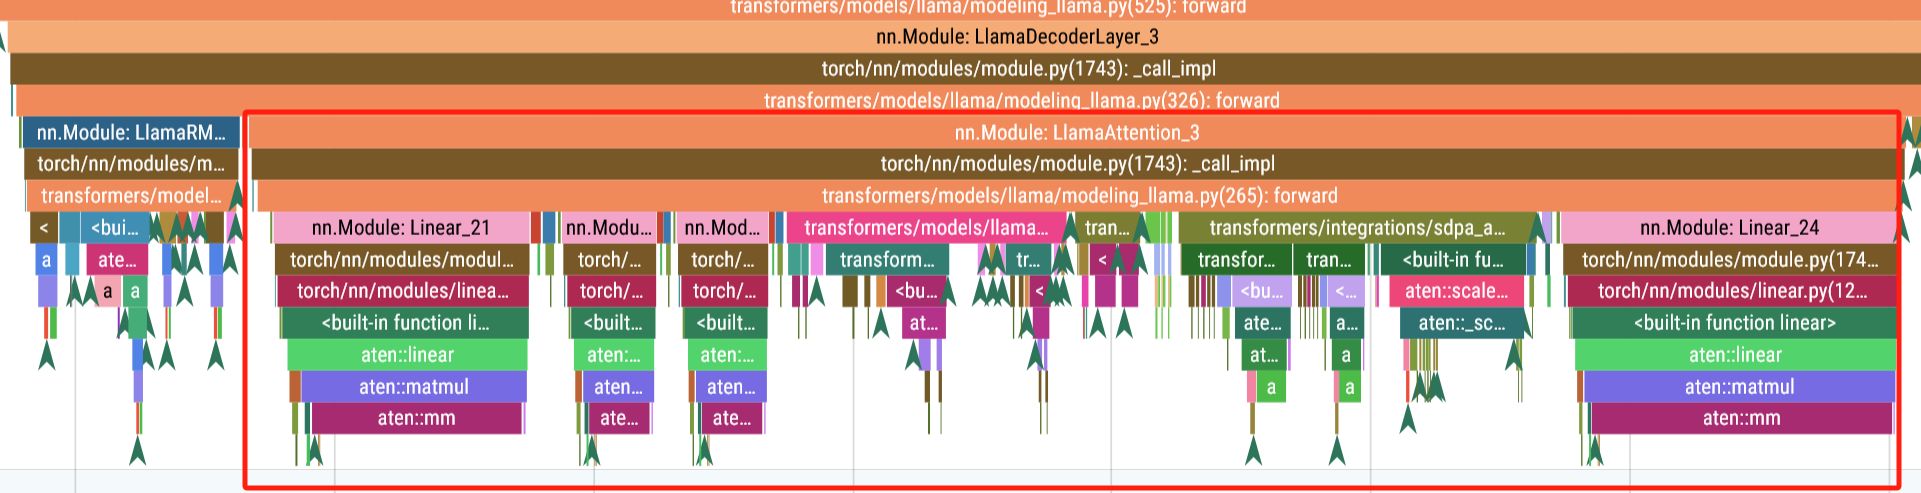
time: 4ms Norm 200us Attention 1.28 ms Norm2 200us MLP 2.3 ms
llama/llama/model.py at main · meta-llama/llama
class TransformerBlock(nn.Module):
def __init__(self, layer_id: int, args: ModelArgs):
"""
Initialize a TransformerBlock.
Args:
layer_id (int): Identifier for the layer.
args (ModelArgs): Model configuration parameters.
Attributes:
n_heads (int): Number of attention heads.
dim (int): Dimension size of the model.
head_dim (int): Dimension size of each attention head.
attention (Attention): Attention module.
feed_forward (FeedForward): FeedForward module.
layer_id (int): Identifier for the layer.
attention_norm (RMSNorm): Layer normalization for attention output.
ffn_norm (RMSNorm): Layer normalization for feedforward output.
"""
super().__init__()
self.n_heads = args.n_heads
self.dim = args.dim
self.head_dim = args.dim // args.n_heads
self.attention = Attention(args)
self.feed_forward = FeedForward(
dim=args.dim,
hidden_dim=4 * args.dim,
multiple_of=args.multiple_of,
ffn_dim_multiplier=args.ffn_dim_multiplier,
)
self.layer_id = layer_id
self.attention_norm = RMSNorm(args.dim, eps=args.norm_eps)
self.ffn_norm = RMSNorm(args.dim, eps=args.norm_eps)
def forward(
self,
x: torch.Tensor,
start_pos: int,
freqs_cis: torch.Tensor,
mask: Optional[torch.Tensor],
):
"""
Perform a forward pass through the TransformerBlock.
Args:
x (torch.Tensor): Input tensor.
start_pos (int): Starting position for attention caching.
freqs_cis (torch.Tensor): Precomputed cosine and sine frequencies.
mask (torch.Tensor, optional): Masking tensor for attention. Defaults to None.
Returns:
torch.Tensor: Output tensor after applying attention and feedforward layers.
"""
h = x + self.attention(
self.attention_norm(x), start_pos, freqs_cis, mask
)
out = h + self.feed_forward(self.ffn_norm(h)) # 图中的block在这里!!
return out</code></pre>
可以看到用两行代码就干碎了。
Attention block
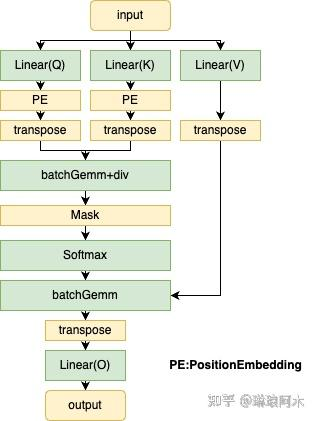
Attention 模块的核心组件主要包含Query、Key、Value 的线性变换以及输出线性投影。计算流程如下:
class Attention(nn.Module):
"""Multi-head attention module."""
def __init__(self, args: ModelArgs):
"""
Initialize the Attention module.
Args:
args (ModelArgs): Model configuration parameters.
Attributes:
n_kv_heads (int): Number of key and value heads.
n_local_heads (int): Number of local query heads.
n_local_kv_heads (int): Number of local key and value heads.
n_rep (int): Number of repetitions for local heads.
head_dim (int): Dimension size of each attention head.
wq (ColumnParallelLinear): Linear transformation for queries.
wk (ColumnParallelLinear): Linear transformation for keys.
wv (ColumnParallelLinear): Linear transformation for values.
wo (RowParallelLinear): Linear transformation for output.
cache_k (torch.Tensor): Cached keys for attention.
cache_v (torch.Tensor): Cached values for attention.
"""
super().__init__()
self.n_kv_heads = args.n_heads if args.n_kv_heads is None else args.n_kv_heads
model_parallel_size = fs_init.get_model_parallel_world_size()
self.n_local_heads = args.n_heads // model_parallel_size
self.n_local_kv_heads = self.n_kv_heads // model_parallel_size
self.n_rep = self.n_local_heads // self.n_local_kv_heads
self.head_dim = args.dim // args.n_heads
self.wq = ColumnParallelLinear(
args.dim,
args.n_heads * self.head_dim,
bias=False,
gather_output=False,
init_method=lambda x: x,
)
self.wk = ColumnParallelLinear(
args.dim,
self.n_kv_heads * self.head_dim,
bias=False,
gather_output=False,
init_method=lambda x: x,
)
self.wv = ColumnParallelLinear(
args.dim,
self.n_kv_heads * self.head_dim,
bias=False,
gather_output=False,
init_method=lambda x: x,
)
self.wo = RowParallelLinear(
args.n_heads * self.head_dim,
args.dim,
bias=False,
input_is_parallel=True,
init_method=lambda x: x,
)
self.cache_k = torch.zeros(
(
args.max_batch_size,
args.max_seq_len,
self.n_local_kv_heads,
self.head_dim,
)
).cuda()
self.cache_v = torch.zeros(
(
args.max_batch_size,
args.max_seq_len,
self.n_local_kv_heads,
self.head_dim,
)
).cuda()
def forward(
self,
x: torch.Tensor,
start_pos: int,
freqs_cis: torch.Tensor,
mask: Optional[torch.Tensor],
):
"""
Forward pass of the attention module.
Args:
x (torch.Tensor): Input tensor.
start_pos (int): Starting position for caching.
freqs_cis (torch.Tensor): Precomputed frequency tensor.
mask (torch.Tensor, optional): Attention mask tensor.
Returns:
torch.Tensor: Output tensor after attention.
"""
# **输入形状处理**
bsz, seqlen, _ = x.shape
# 1. **输入变换** - 通过三个独立的线性层将输入映射到查询(Query)、键(Key)、值(Value)空间。
xq, xk, xv = self.wq(x), self.wk(x), self.wv(x)
2. **layout转换
- 将Q/K/V分别重塑为多头结构,其中:
# - `n_local_heads`: 查询头数
# - `n_local_kv_heads`: 键值头数(通常 ≤ 查询头数)
# - `head_dim`: 每个头的维度
xq = xq.view(bsz, seqlen, self.n_local_heads, self.head_dim)
xk = xk.view(bsz, seqlen, self.n_local_kv_heads, self.head_dim)
xv = xv.view(bsz, seqlen, self.n_local_kv_heads, self.head_dim)
3. 应用旋转位置编码
- 使用旋转位置编码(Rotary Position Embedding)为Q/K注入位置信息,增强模型的位置感知能力。
xq, xk = apply_rotary_emb(xq, xk, freqs_cis=freqs_cis)
键值缓存更新
- 缓存机制:在自回归生成时,将当前步计算的键值存入缓存,避免重复计算历史token的K/V。
- start_pos表示当前处理的起始位置,适用于流式生成场景。
self.cache_k = self.cache_k.to(xq)
self.cache_v = self.cache_v.to(xq)
self.cache_k[:bsz, start_pos : start_pos + seqlen] = xk
self.cache_v[:bsz, start_pos : start_pos + seqlen] = xv
构建完整的注意力上下文
keys = self.cache_k[:bsz, : start_pos + seqlen] # 获取历史及当前K
values = self.cache_v[:bsz, : start_pos + seqlen] # 获取历史及当前V
多头重复策略(GQA/MQA)
- Grouped-Query Attention: repeat k/v heads if n_kv_heads < n_heads
- n_rep = n_local_heads // n_local_kv_heads,表示每个KV头重复的次数。
keys = repeat_kv(keys, self.n_rep) # (bs, cache_len + seqlen, n_local_heads, head_dim)
values = repeat_kv(values, self.n_rep) # (bs, cache_len + seqlen, n_local_heads, head_dim)
张量转置(调整维度顺序) - 将多头维度提前,便于后续矩阵运算。
xq = xq.transpose(1, 2) # (bs, n_local_heads, seqlen, head_dim)
keys = keys.transpose(1, 2) # (bs, n_local_heads, cache_len + seqlen, head_dim)
values = values.transpose(1, 2) # (bs, n_local_heads, cache_len + seqlen, head_dim)
4. 注意力得分计算 - 计算Q与K的点积,缩放因子sqrt(d_k)防止梯度爆炸。
scores = torch.matmul(xq, keys.transpose(2, 3)) / math.sqrt(self.head_dim)
# **注意力掩码处理**
# - **因果掩码**:在解码时屏蔽未来信息,确保当前位置只能关注前面token。
# - **填充掩码**:忽略padding token的影响。
if mask is not None:
scores = scores + mask # (bs, n_local_heads, seqlen, cache_len + seqlen)
# 5. **Softmax归一化** - 对注意力得分进行归一化,转换为概率分布。
scores = F.softmax(scores.float(), dim=-1).type_as(xq)
# 6. **加权求和生成上下文向量** - 使用注意力权重对Value加权求和,得到每个位置的上下文表示。
output = torch.matmul(scores, values) # (bs, n_local_heads, seqlen, head_dim)
# 7. **合并多头输出** - 将多头输出拼接回原始形状,准备进行后续处理。
output = output.transpose(1, 2).contiguous().view(bsz, seqlen, -1)
# 8. **输出投影** - 通过线性层`wo`将多头输出映射回模型维度。
return self.wo(output) # 线性层聚合多头信息</code></pre>
Attention 的计算过程如下:
- 输入变换:将输入的特征向量 X 通过三组独立的线性层,分别生成
Query ( Q )、Key ( K ) 和 Value ( V ),公式为: xq, xk, xv = self.wq(x), self.wk(x), self.wv(x) ,其中, WQ 、 WK 、 WV 是可学习的权重矩阵。
# 1. **输入变换** - 通过三个独立的线性层将输入映射到查询(Query)、键(Key)、值(Value)空间。
xq, xk, xv = self.wq(x), self.wk(x), self.wv(x)


Matmul 1: 200us
Matmul 2: 71us
Matmul 3: 70us

-
layout转换: 将 Query ( Q )、Key ( K ) 和 Value ( V )的的张量布局由[batch_size,seq_len,head_num,d_model]转为 [batch_size,head_num,seq_len,d_model],这种布局转换是为了适应多头注意力机制的计算需求,将每个头的查询、键和值的维度重新排列,使得计算能够并行处理不同头部的注意力权重,同时提高计算效率。
-
位置编码:将位置信息加入到 Q 和 K 向量中,以便模型能够捕捉到序列中元素的顺序关系。通过对 Q 和 K 进行位置编码,Transformer模型可以理解输入序列中元素的相对或绝对位置,从而在自注意力机制中更好地处理序列顺序的依赖性。
-
计算注意力得分:
通过点积操作计算 Query 和 Key 之间的相似度,获得注意力得分矩阵:
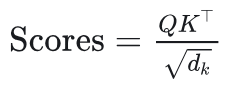
这里, dk 是 Key 的特征维度,用于缩放防止数值过大。
-
归一化得分:
对得分矩阵应用 Softmax 函数,将其归一化为概率分布: Attention Weights=Softmax(Scores)
-
加权求和:
使用归一化后的注意力权重对 Value 矩阵进行加权求和,生成上下文表示: Attention Output=Attention Weights⋅V
-
layout转换:将Attention Output 的张量布局从[batch_size,head_num,seq_len,d_model]转为[batch_size,seq_len,head_num,d_model],这一转换是为了恢复原始序列的顺序,并将多头注意力的输出按序列长度排列,以便后续操作(如拼接或线性变换)能够正确地处理每个头的输出信息。
-
线性投影:
将多头注意力的输出拼接后,输入线性层进行投影,生成最终的注意力输出: Final Output=Concat(Head1,Head2,…)WO ,其中, Wo 是线性投影的权重矩阵。
通过这一过程,Attention 模块能够动态聚焦输入序列中不同位置的重要信息,建模长距离依赖关系。
核心特点解析:
- 高效缓存机制
- 通过维护
cache_k和cache_v,避免在自回归生成时重复计算历史token的K/V,显著提升推理效率。
- 灵活的多头策略
- 支持多查询注意力(MQA)和分组查询注意力(GQA),通过
repeat_kv实现KV头的复用,平衡计算效率和模型表现。
- 旋转位置编码(RoPE)
- 通过绝对位置编码实现相对位置感知,增强模型对位置关系的建模能力。
- 并行计算优化
- 通过矩阵运算并行处理整个序列,充分利用GPU加速。
此实现通过结合现代Transformer模型的多种优化技术,在保证模型表现的同时提升了推理效率。
在使用huggingface中llama3的源码:
class LlamaAttention(nn.Module):
"""Multi-headed attention from 'Attention Is All You Need' paper"""
def __init__(self, config: LlamaConfig, layer_idx: int):
super().__init__()
self.config = config
self.layer_idx = layer_idx
self.head_dim = getattr(config, "head_dim", config.hidden_size // config.num_attention_heads)
self.num_key_value_groups = config.num_attention_heads // config.num_key_value_heads
self.scaling = self.head_dim**-0.5
self.attention_dropout = config.attention_dropout
self.is_causal = True
self.q_proj = nn.Linear(
config.hidden_size, config.num_attention_heads * self.head_dim, bias=config.attention_bias
)
self.k_proj = nn.Linear(
config.hidden_size, config.num_key_value_heads * self.head_dim, bias=config.attention_bias
)
self.v_proj = nn.Linear(
config.hidden_size, config.num_key_value_heads * self.head_dim, bias=config.attention_bias
)
self.o_proj = nn.Linear(
config.num_attention_heads * self.head_dim, config.hidden_size, bias=config.attention_bias
)
def forward(
self,
hidden_states: torch.Tensor,
position_embeddings: Tuple[torch.Tensor, torch.Tensor],
attention_mask: Optional[torch.Tensor],
past_key_value: Optional[Cache] = None,
cache_position: Optional[torch.LongTensor] = None,
**kwargs: Unpack[FlashAttentionKwargs],
) -> Tuple[torch.Tensor, Optional[torch.Tensor], Optional[Tuple[torch.Tensor]]]:
input_shape = hidden_states.shape[:-1]
hidden_shape = (*input_shape, -1, self.head_dim)
// load QKV
query_states = self.q_proj(hidden_states).view(hidden_shape).transpose(1, 2)
key_states = self.k_proj(hidden_states).view(hidden_shape).transpose(1, 2)
value_states = self.v_proj(hidden_states).view(hidden_shape).transpose(1, 2)
ROPE
cos, sin = position_embeddings
query_states, key_states = apply_rotary_pos_emb(query_states, key_states, cos, sin)
KV cache
if past_key_value is not None:
# sin and cos are specific to RoPE models; cache_position needed for the static cache
cache_kwargs = {"sin": sin, "cos": cos, "cache_position": cache_position}
key_states, value_states = past_key_value.update(key_states, value_states, self.layer_idx, cache_kwargs)
ATTENTION
attention_interface: Callable = eager_attention_forward
if self.config._attn_implementation != "eager":
if self.config._attn_implementation == "sdpa" and kwargs.get("output_attentions", False):
logger.warning_once(
"`torch.nn.functional.scaled_dot_product_attention` does not support `output_attentions=True`. Falling back to "
'eager attention. This warning can be removed using the argument `attn_implementation="eager"` when loading the model.'
)
else:
attention_interface = ALL_ATTENTION_FUNCTIONS[self.config._attn_implementation]
attn_output, attn_weights = attention_interface(
self,
query_states,
key_states,
value_states,
attention_mask,
dropout=0.0 if not self.training else self.attention_dropout,
scaling=self.scaling,
**kwargs,
)
attn_output = attn_output.reshape(*input_shape, -1).contiguous()
attn_output = self.o_proj(attn_output)
return attn_output, attn_weights</code></pre>
其实跟llama自己的实现大差不差。
这段代码定义了一个基于 Llama 模型的多头注意力机制(Multi-Head Attention)的 PyTorch 实现,参考了《Attention Is All You Need》论文。以下是对其推理过程(即 forward 方法)的详细解读,结合代码逐步分析其工作原理和关键点:
1. 代码结构概述
LlamaAttention 是一个 nn.Module,实现了一个 Transformer 的多头注意力层。它支持:
- 分组查询注意力(Grouped-Query Attention, GQA):通过
num_key_value_groups 实现,减少键值对头的数量以优化计算。
- 旋转位置编码(Rotary Positional Embedding, RoPE):通过
apply_rotary_pos_emb 融入位置信息。
- 键值缓存(Key-Value Cache):用于加速自回归推理(如生成任务)。
- 多种注意力实现:支持
eager(默认逐行计算)、sdpa(PyTorch 的 scaled_dot_product_attention)或 flash(如 FlashAttention 优化)。
推理过程发生在 forward 方法中,输入包括:
hidden_states:输入的隐藏状态张量,形状为 (batch_size, seq_len, hidden_size)。position_embeddings:RoPE 的余弦(cos)和正弦(sin)位置编码。attention_mask:可选的掩码,用于屏蔽某些位置(如填充 token 或因果注意力)。past_key_value:键值缓存,用于自回归推理。cache_position:缓存的位置索引。kwargs:额外参数(如 FlashAttention 的配置)。
输出为:
attn_output:注意力计算后的输出张量,形状为 (batch_size, seq_len, hidden_size)。attn_weights:注意力权重(可选,训练时可能用到)。
2. 推理过程逐行解读
输入处理
input_shape = hidden_states.shape[:-1] # (batch_size, seq_len)
hidden_shape = (*input_shape, -1, self.head_dim) # (batch_size, seq_len, num_heads, head_dim)
- 提取输入张量的形状,
input_shape 保存 batch_size 和 seq_len,忽略最后一维(hidden_size)。
- 定义
hidden_shape,用于将张量重塑为多头格式,其中 -1 会被替换为 num_attention_heads 或 num_key_value_heads。
线性投影
self.q_proj = nn.Linear(
config.hidden_size, config.num_attention_heads * self.head_dim, bias=config.attention_bias
)
self.k_proj = nn.Linear(
config.hidden_size, config.num_key_value_heads * self.head_dim, bias=config.attention_bias
)
self.v_proj = nn.Linear(
config.hidden_size, config.num_key_value_heads * self.head_dim, bias=config.attention_bias
)
query_states = self.q_proj(hidden_states).view(hidden_shape).transpose(1, 2)
key_states = self.k_proj(hidden_states).view(hidden_shape).transpose(1, 2)
value_states = self.v_proj(hidden_states).view(hidden_shape).transpose(1, 2)

- 投影:通过线性层
q_proj、k_proj 和 v_proj,将输入的 hidden_states 分别映射到查询(Query)、键(Key)和值(Value)张量。
- 查询张量的输出维度:
num_attention_heads * head_dim。
- 键和值张量的输出维度:
num_key_value_heads * head_dim(GQA 可能使 num_key_value_heads 小于 num_attention_heads)。
- 重塑:使用
view(hidden_shape) 将张量重塑为 (batch_size, seq_len, num_heads, head_dim),其中 num_heads 对应于注意力头数。
- 转置:通过
transpose(1, 2) 将张量变为 (batch_size, num_heads, seq_len, head_dim),方便后续按头并行计算注意力。
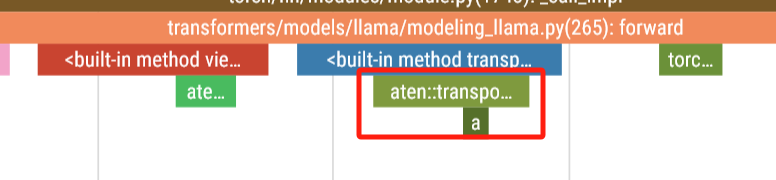
Matmul 1: 200us
Matmul 2: 71us
Matmul 3: 70us
应用旋转位置编码(RoPE)
cos, sin = position_embeddings
query_states, key_states = apply_rotary_pos_emb(query_states, key_states, cos, sin)
position_embeddings 是一个包含余弦和正弦值的元组,用于 RoPE。apply_rotary_pos_emb 函数将位置信息融入 query_states 和 key_states,通过旋转操作(基于正弦和余弦)为每个 token 添加位置依赖性。- 注意:
value_states 不应用 RoPE,因为值张量不直接依赖位置信息。
 200us


键值缓存(Key-Value Cache)
if past_key_value is not None:
cache_kwargs = {"sin": sin, "cos": cos, "cache_position": cache_position}
key_states, value_states = past_key_value.update(key_states, value_states, self.layer_idx, cache_kwargs)
 Time: 50us
- 作用:在自回归推理(如语言生成)中,键值缓存存储之前时间步的
key_states 和 value_states,避免重复计算。
- 更新缓存:
past_key_value.update 将当前时间步的 key_states 和 value_states 追加到缓存中,并返回更新后的键值张量。
- 参数:
sin 和 cos:用于 RoPE 的位置编码。cache_position:指示当前 token 在序列中的位置。layer_idx:标识当前注意力层的索引。
- 推理优化:在生成任务中,模型通常只处理最新 token,缓存允许快速访问历史信息,显著降低计算量。
选择注意力实现
attention_interface: Callable = eager_attention_forward
if self.config._attn_implementation != "eager":
if self.config._attn_implementation == "sdpa" and kwargs.get("output_attentions", False):
logger.warning_once(...)
else:
attention_interface = ALL_ATTENTION_FUNCTIONS[self.config._attn_implementation]

 20 us
- 根据
config._attn_implementation,选择注意力计算方式:
eager:逐行实现的标准注意力,适合调试或需要输出注意力权重。sdpa:使用 PyTorch 的 scaled_dot_product_attention,性能更高,但不支持 output_attentions=True。flash:使用 FlashAttention 或类似优化,适合大规模模型,效率最高。
- 如果选择了
sdpa 但要求输出注意力权重,会回退到 eager 并发出警告。
计算注意力
attn_output, attn_weights = attention_interface(
self,
query_states,
key_states,
value_states,
attention_mask,
dropout=0.0 if not self.training else self.attention_dropout,
scaling=self.scaling,
**kwargs,
)
Scaled Dot-product Attention:276 us
- 核心计算:调用选定的
attention_interface 执行注意力机制:
- 缩放点积:计算
Q @ K^T / sqrt(head_dim),得到注意力分数(self.scaling = head_dim**-0.5 用于稳定梯度)。
- 掩码:应用
attention_mask(如因果掩码,防止未来 token 影响当前 token)。
- Softmax:将注意力分数归一化为权重。
- 加权求和:用注意力权重加权
value_states,得到每头的输出。
- Dropout:推理时(
self.training=False)禁用 dropout,训练时根据 attention_dropout 应用。
- 输出:
attn_output:形状为 (batch_size, num_heads, seq_len, head_dim),表示注意力结果。attn_weights:注意力权重(可能为 None,依赖实现和配置)。
输出投影与重塑
self.o_proj = nn.Linear(
config.num_attention_heads * self.head_dim, config.hidden_size, bias=config.attention_bias
)
attn_output = attn_output.reshape(*input_shape, -1).contiguous()
attn_output = self.o_proj(attn_output)
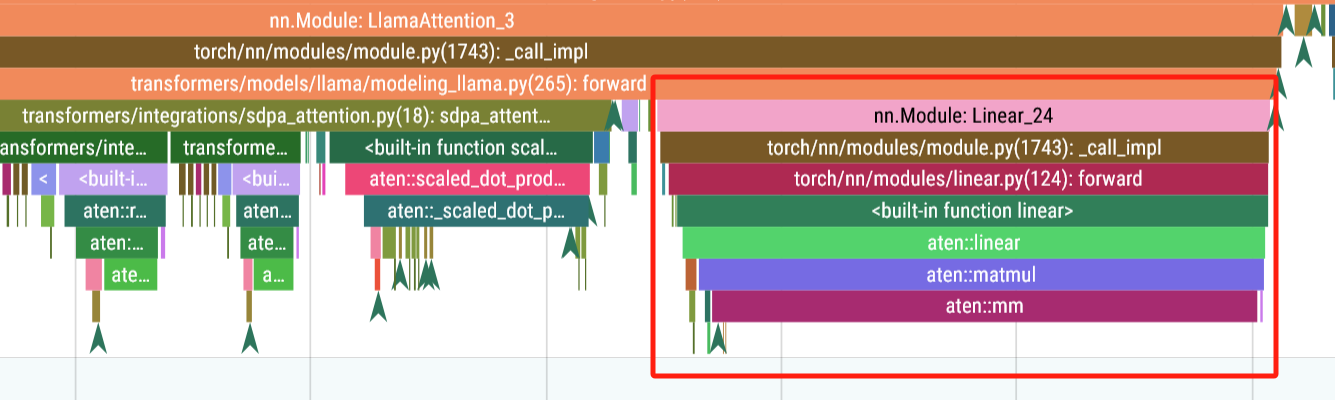 time: 263us
- 重塑:将
attn_output 从 (batch_size, num_heads, seq_len, head_dim) 变回 (batch_size, seq_len, num_attention_heads * head_dim)。
- 投影:通过
o_proj 线性层将注意力输出映射回 hidden_size 维度,得到最终输出,形状为 (batch_size, seq_len, hidden_size)。
- contiguous:确保张量在内存中连续,优化后续操作。
返回结果
return attn_output, attn_weights
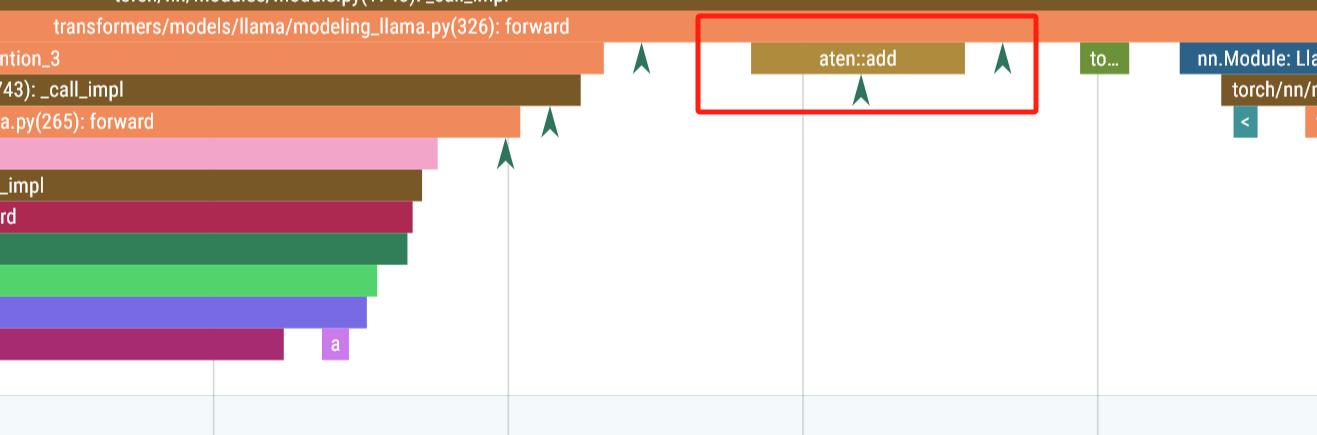
- 返回
attn_output(注意力层输出)和 attn_weights(注意力权重,若计算则返回,否则可能为 None)。
3. 推理中的关键优化
-
分组查询注意力(GQA):
num_key_value_groups 定义了查询头与键值头之间的分组比例。- 减少
num_key_value_heads(键值对头数)降低内存和计算开销,同时保持 num_attention_heads(查询头数)以保留表达能力。
- 在推理中,这显著减少了键值缓存的内存占用。
-
键值缓存:
- 在自回归推理中,缓存历史键值对避免重复计算。
- 每次只处理最新 token,缓存将历史信息与当前输入拼接,推理时间从 O(seq_len^2) 降为 O(seq_len)。
-
旋转位置编码(RoPE):
- RoPE 通过旋转操作融入位置信息,无需显式位置嵌入,减少参数量。
- 在推理中,
sin 和 cos 可预计算,动态应用于当前 token。
-
高效注意力实现:
flash 模式(如 FlashAttention)通过融合操作减少 GPU 内存读写,加速推理。sdpa 利用 PyTorch 优化的内核,适合中小规模模型。- 选择合适的实现根据硬件和模型规模平衡速度与功能(如是否需要
attn_weights)。
-
因果注意力:
self.is_causal = True 表明这是一个自回归模型,推理时通过 attention_mask 确保当前 token 只关注之前 token。
4. 推理性能分析
- 计算复杂度:
- 投影层(
q_proj, k_proj, v_proj, o_proj):O(seq_len * hidden_size^2)。
- 注意力计算:O(seq_len^2 head_dim num_heads)(无缓存),或 O(seq_len head_dim num_heads)(有缓存)。
- GQA 进一步减少键值计算量。
- 内存需求:
- 键值缓存:O(seq_len num_key_value_heads head_dim * num_layers)。
- FlashAttention 减少中间张量的内存占用。
- 瓶颈:
- 长序列推理时,缓存内存可能成为瓶颈。
- 注意力计算(尤其是
eager 模式)可能较慢,推荐 flash 或 sdpa。
LlamaAttention 的推理过程高效地实现了多头注意力,结合 GQA、RoPE 和键值缓存优化了自回归生成任务的性能。其核心步骤包括投影、位置编码、注意力计算和输出投影,支持多种高效实现(如 FlashAttention)。在推理中,缓存和 GQA 是关键优化点,显著降低计算和内存开销,适合大规模语言模型的部署。
FFN
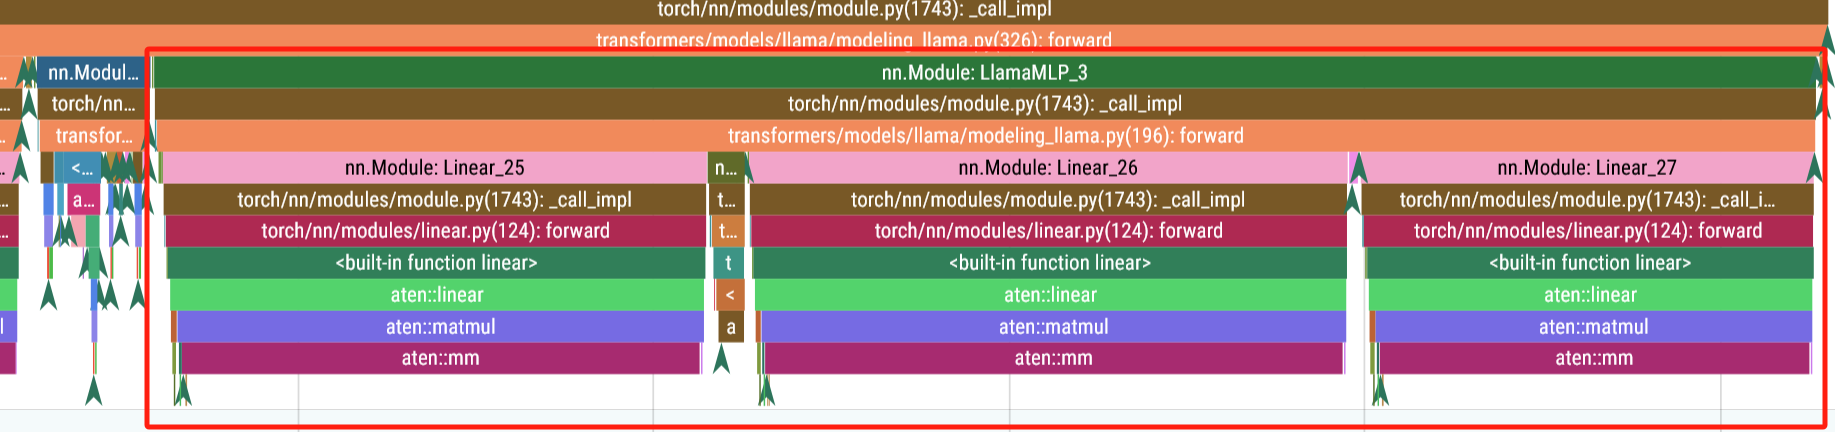
Silu
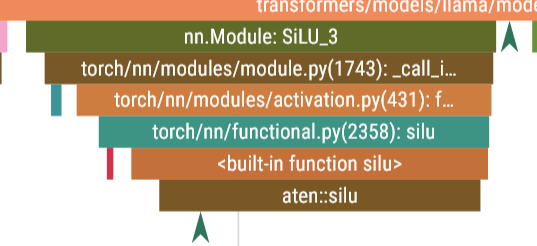 matmul
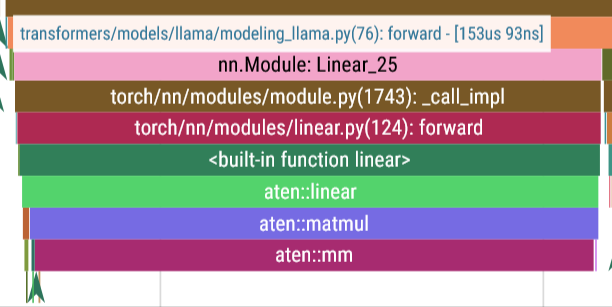
llama/llama/model.py at main · meta-llama/llama
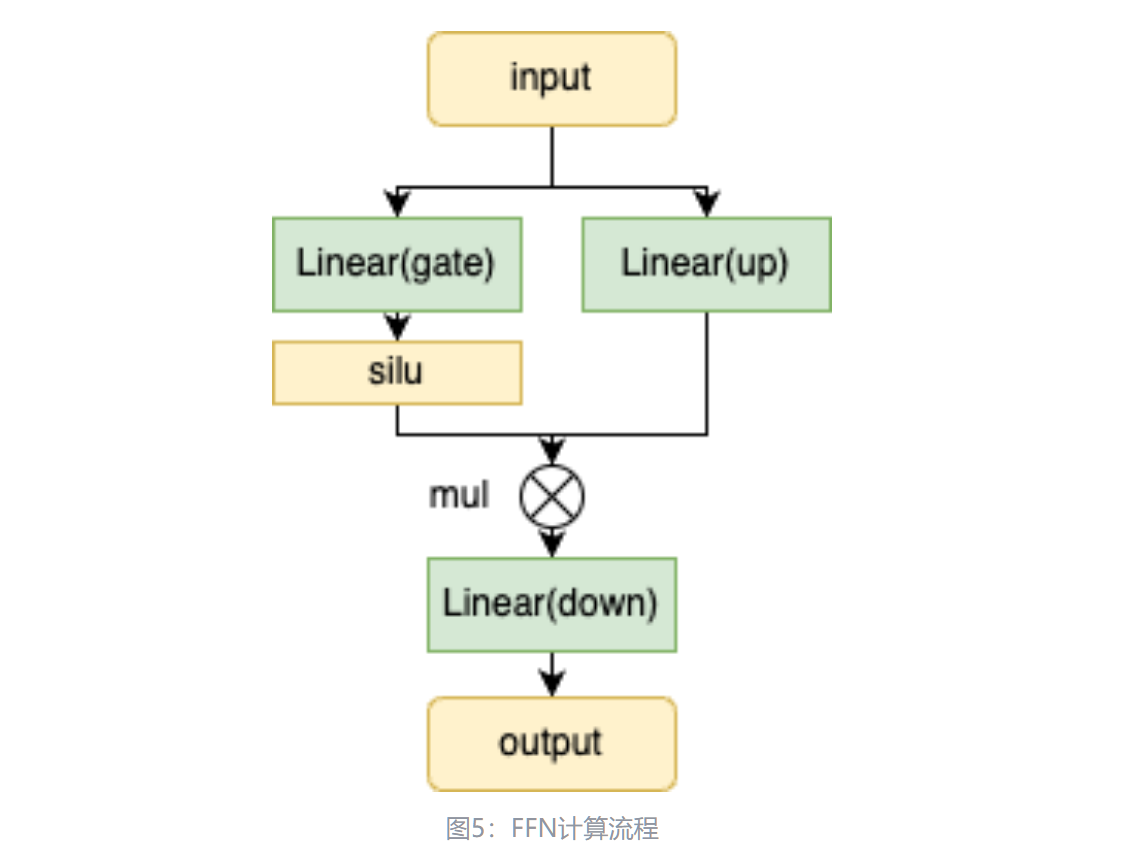
首先,输入通过两个全连接层——gate和up进行初步变换,其中gate的输出经过激活函数(silu)进行非线性变换,与up的输出做点乘,最后再通过down全连接层进行进一步处理。FFN模块的作用是增强模型的表达能力,从而在Transformer架构中捕捉更复杂的特征。
silu 公式:

class FeedForward(nn.Module):
def __init__(
self,
dim: int,
hidden_dim: int,
multiple_of: int,
ffn_dim_multiplier: Optional[float],
):
"""
Initialize the FeedForward module.
Args:
dim (int): Input dimension.
hidden_dim (int): Hidden dimension of the feedforward layer.
multiple_of (int): Value to ensure hidden dimension is a multiple of this value.
ffn_dim_multiplier (float, optional): Custom multiplier for hidden dimension. Defaults to None.
Attributes:
w1 (ColumnParallelLinear): Linear transformation for the first layer.
w2 (RowParallelLinear): Linear transformation for the second layer.
w3 (ColumnParallelLinear): Linear transformation for the third layer.
"""
super().__init__()
hidden_dim = int(2 * hidden_dim / 3)
# custom dim factor multiplier
if ffn_dim_multiplier is not None:
hidden_dim = int(ffn_dim_multiplier * hidden_dim)
hidden_dim = multiple_of * ((hidden_dim + multiple_of - 1) // multiple_of)
self.w1 = ColumnParallelLinear(
dim, hidden_dim, bias=False, gather_output=False, init_method=lambda x: x
)
self.w2 = RowParallelLinear(
hidden_dim, dim, bias=False, input_is_parallel=True, init_method=lambda x: x
)
self.w3 = ColumnParallelLinear(
dim, hidden_dim, bias=False, gather_output=False, init_method=lambda x: x
)
def forward(self, x):
return self.w2(F.silu(self.w1(x)) * self.w3(x))</code></pre>
FeedForward 是一个 nn.Module,实现了一个前馈网络,常见于 Transformer 的每个注意力层之后。它的主要特点包括:
- SwiGLU 激活:结合 SiLU(Swish)激活函数和门控机制,增强非线性表达能力。
- 并行线性层:使用 ColumnParallelLinear 和 RowParallelLinear,支持模型并行(如张量并行),适合分布式训练。
- 动态隐藏维度:通过 multiple_of 和 ffn_dim_multiplier 调整隐藏层维度,确保高效计算和内存对齐。
代码由两部分组成:
- init:初始化模块,定义线性层和隐藏维度。
- forward:定义前向传播逻辑,执行 MLP 计算。
参数
def __init__(
self,
dim: int, # 输入维度
hidden_dim: int, # 隐藏层维度(初始值)
multiple_of: int, # 确保隐藏维度是该值的倍数
ffn_dim_multiplier: Optional[float], # 可选的隐藏维度缩放因子
):
- dim:输入和输出的维度,通常等于 Transformer 的 hidden_size(如 4096)。
- hidden_dim:隐藏层的初始维度,通常较大(如 4 * dim)。
- multiple_of:用于调整隐藏维度,使其成为某个值的倍数(优化内存对齐和计算效率)。
- ffn_dim_multiplier:可选的缩放因子,用于自定义隐藏维度。
隐藏维度调整
hidden_dim = int(2 * hidden_dim / 3)
if ffn_dim_multiplier is not None:
hidden_dim = int(ffn_dim_multiplier * hidden_dim)
hidden_dim = multiple_of * ((hidden_dim + multiple_of - 1) // multiple_of)
- 初始缩放:hidden_dim = int(2 * hidden_dim / 3),将输入的 hidden_dim 缩减到原来的 2/3。这可能是为了适配 SwiGLU 的门控机制,降低计算量。
- 自定义缩放:如果提供了 ffn_dim_multiplier,则进一步按该因子调整 hidden_dim。
- 对齐调整:通过 multiple_of * ((hidden_dim + multiple_of - 1) // multiple_of),确保 hidden_dim 是 multiple_of 的倍数。这种对齐优化了 GPU/TPU 上的内存访问和计算效率(例如,适配 SIMD 指令或缓存行)。
线性层定义
self.w1 = ColumnParallelLinear(
dim, hidden_dim, bias=False, gather_output=False, init_method=lambda x: x
)
self.w2 = RowParallelLinear(
hidden_dim, dim, bias=False, input_is_parallel=True, init_method=lambda x: x
)
self.w3 = ColumnParallelLinear(
dim, hidden_dim, bias=False, gather_output=False, init_method=lambda x: x
)
- 线性层:
- w1:从 dim 映射到 hidden_dim,用于计算 SwiGLU 的主路径。
- w3:从 dim 映射到 hidden_dim,用于计算 SwiGLU 的门控路径。
- w2:从 hidden_dim 映射回 dim,生成最终输出。
- 并行特性:
- ColumnParallelLinear:输入按列分割,适合张量并行,每个进程处理部分输出维度(hidden_dim)。
- RowParallelLinear:输入按行分割(hidden_dim),输出在进程间聚合,恢复 dim 维度。
- gather_output=False(w1, w3):输出保留分割状态,减少通信开销。
- input_is_parallel=True(w2):输入已经是并行分割的,匹配 w1 和 w3 的输出。
- 无偏置:bias=False,减少参数量,依赖归一化层(如 LayerNorm)处理偏移。
- 初始化:init_method=lambda x: x,保留输入权重(可能在外部统一初始化)。
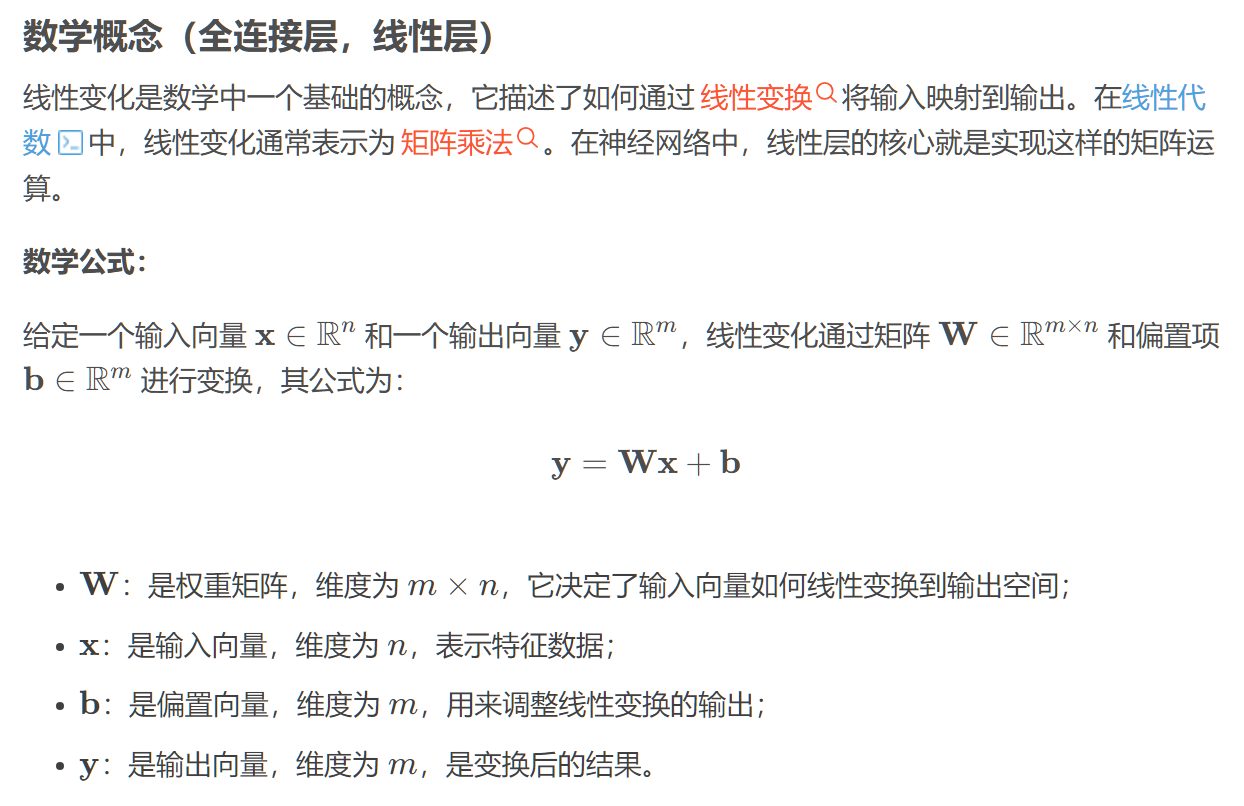
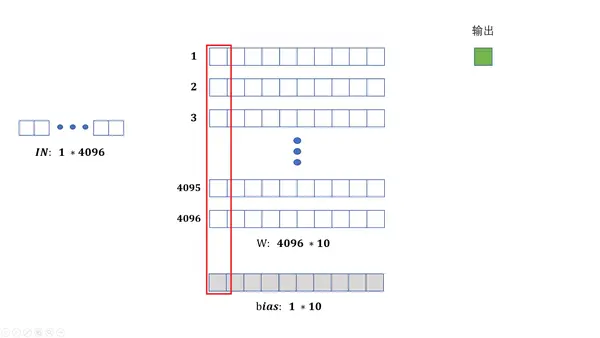
FeedForward 模块中的三个线性层(w1, w2, w3)执行的实际运算是矩阵乘法,这是 PyTorch 中 nn.Linear(及其并行变体 ColumnParallelLinear 和 RowParallelLinear)的核心操作。
ColumnParallelLinear
w1_out = x @ w1_weight^T
w3_out = x @ w3_weight^T
- 权重矩阵按 hidden_dim 维度分割到多个设备。
- 每个设备计算部分输出维度,输出仍为 (batch_size * seq_len, hidden_dim),但分割存储(gather_output=False)。
RowParallelLinear
w2_out = gate_out @ w2_weight^T
- 输入 gate_out 按 hidden_dim 维度分割(与 w1 和 w3 的输出匹配,input_is_parallel=True)。
- 每个设备计算部分矩阵乘法,结果按 dim 维度聚合,生成完整的 (batch_size * seq_len, dim)。
RMSNorm
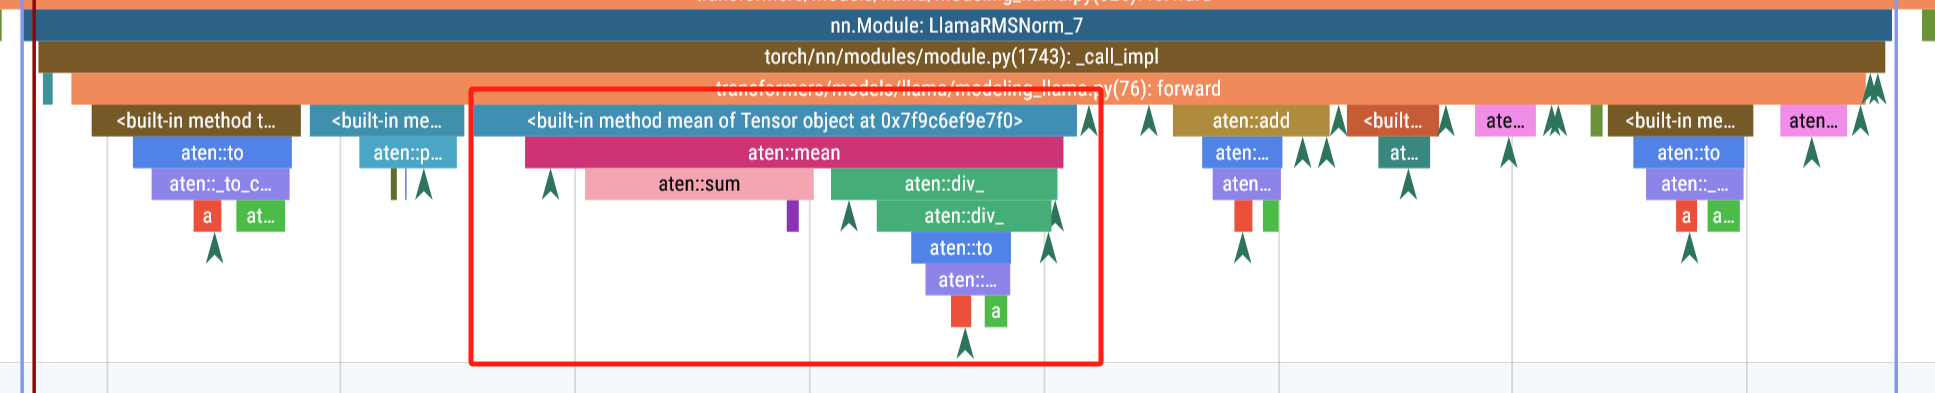
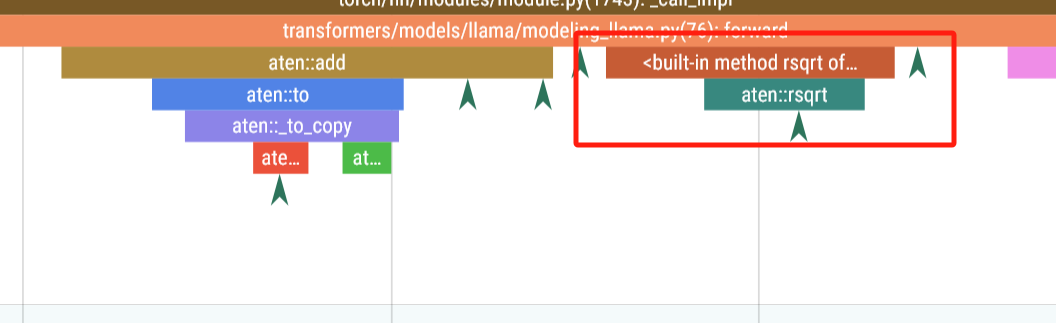
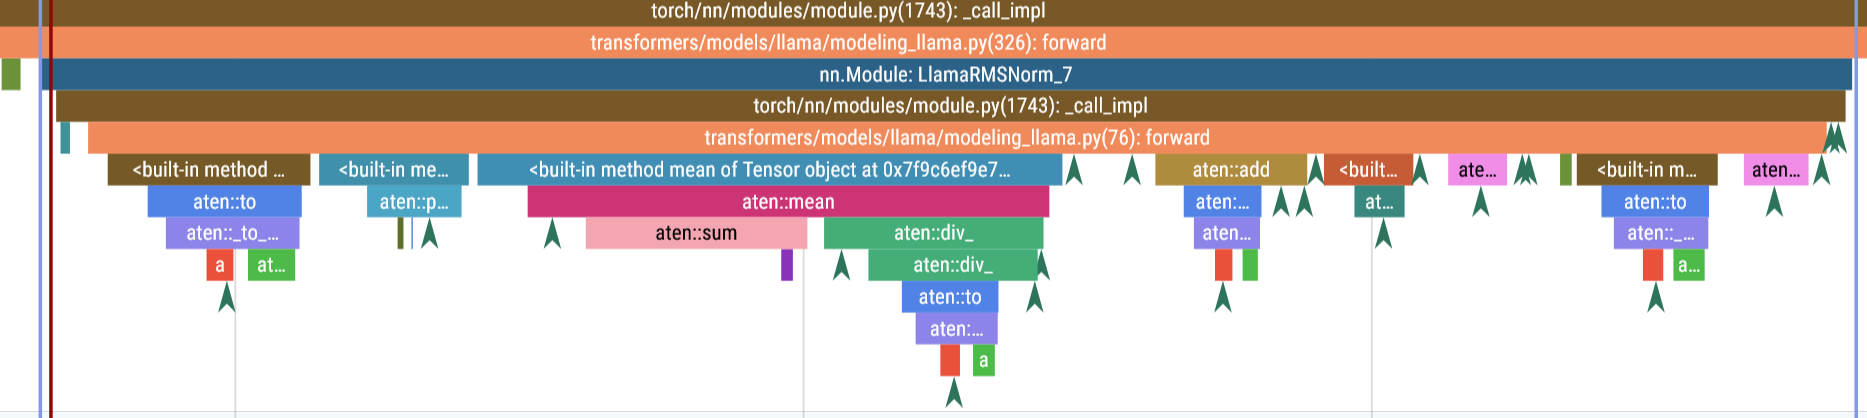 159us
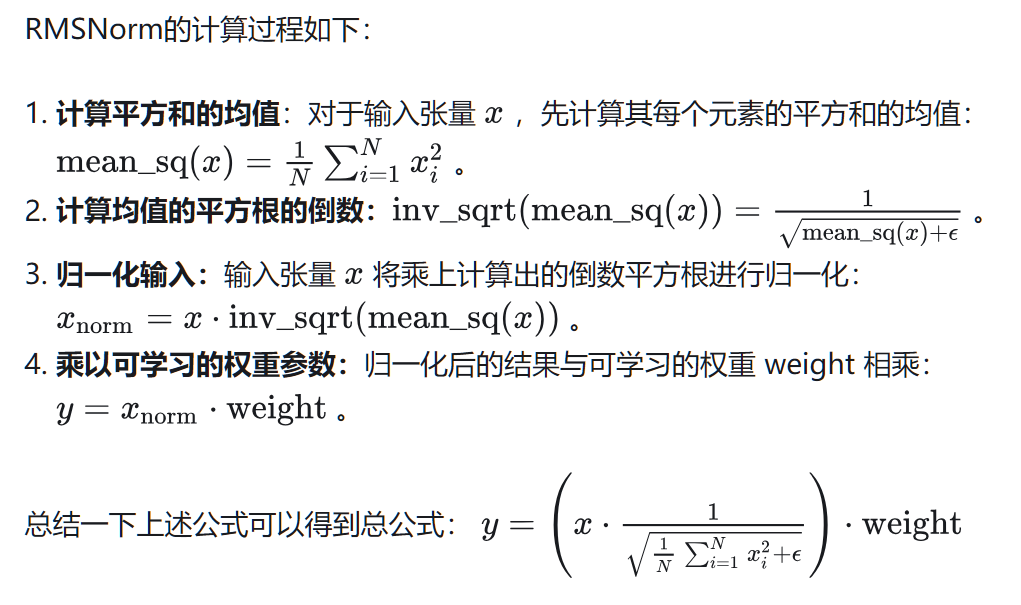
-
计算均值
-
平方根倒数
-
归一化
-
权重
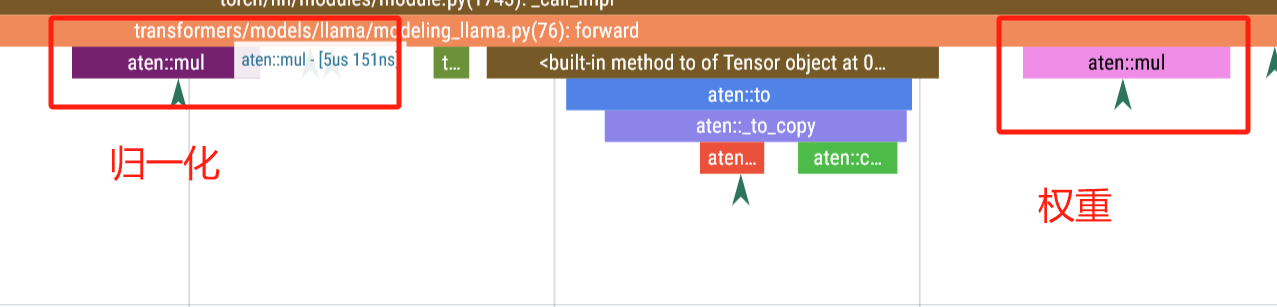
class RMSNorm(torch.nn.Module):
def __init__(self, dim: int, eps: float = 1e-6):
super().__init__()
self.eps = eps
self.weight = nn.Parameter(torch.ones(dim))
def _norm(self, x):
return x * torch.rsqrt(x.pow(2).mean(-1, keepdim=True) + self.eps)
def forward(self, x):
output = self._norm(x.float()).type_as(x)
return output * self.weight</code></pre>
整体结构
为了简化讨论,这里我们采用了MHA(多头注意力)结构的模型作为示例。对于GQA(分组注意力)、MQA(混合注意力)等其他变体模型,也可以通过类似的方法进行类比和分析。
为了简化图示表达,我们对大模型推理过程中常见的张量形状进行了简化表示:
- Batch Size (B):表示每次推理中处理的样本数量。
- Sequence Length (S):表示每个样本的序列长度,通常是文本的单词或字符数。
- Hidden Size (H):表示隐藏层的维度,通常与模型的复杂度相关。
- Vocabulary Size (V):表示模型词汇表的大小,通常决定了词嵌入的维度。
- Number of Attention Heads (A):表示每层自注意力机制的头数,影响模型的计算量。
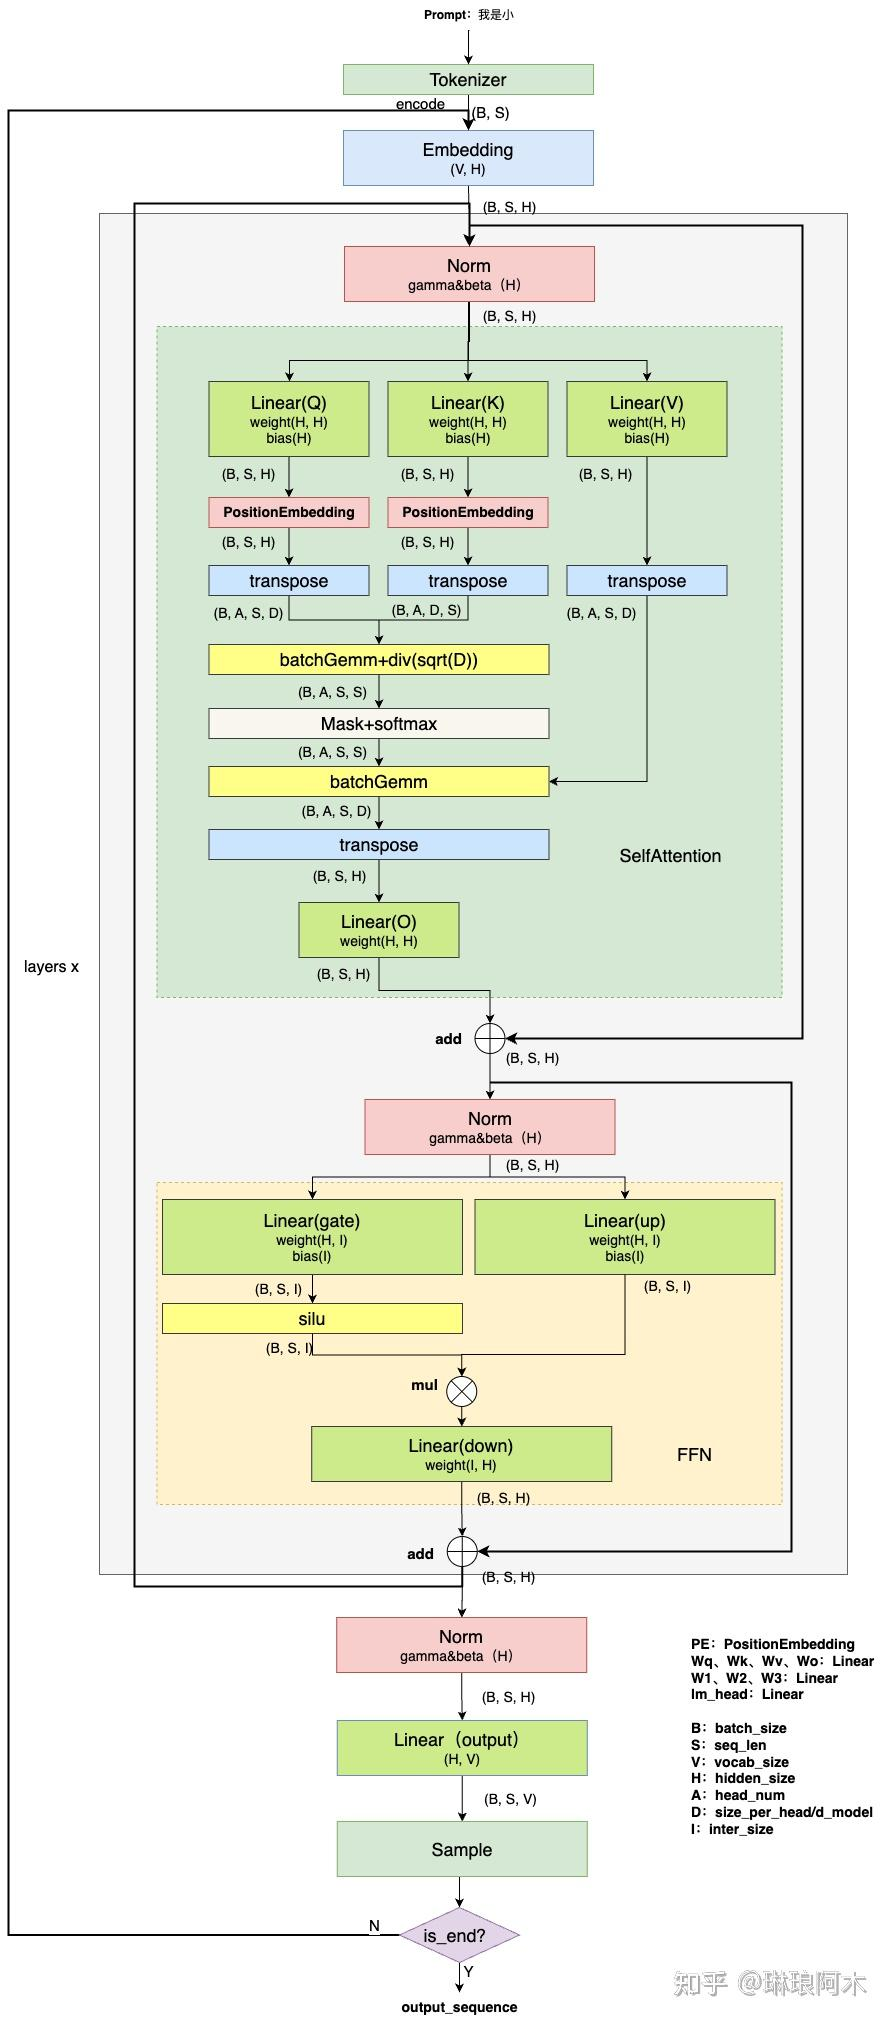
Output 层与Sample 层
掌握一个模型的架构及优化方法,可以通过类比快速理解并迁移到其他模型上。
要深入了解大型语言模型(LLM)在 CPU 端的推理加速,以及整个系统的调用栈,分析 transformers 库的源码是一个很好的起点,以下是逐步解析调用栈和建议从哪里开始看源码的指南:
1. 理解 pipeline 的调用栈
在你的代码中,pipe = pipeline(...) 和 res = pipe(prompt) 是核心调用点。以下是 pipeline 的高层调用流程:
-
pipeline 初始化 (pipeline("text-generation", ...)):
pipeline 会根据任务(text-generation)加载模型和分词器(tokenizer)。- 它会调用
AutoModelForCausalLM(或其他适配模型类)来加载 meta-llama/Llama-3.2-1B 模型。
- 模型会被加载到指定设备(
device_map="auto"),并根据 torch_dtype(如 bfloat16)进行优化。
- 相关的配置(如
max_new_tokens)会被传递到生成逻辑中。
-
推理过程 (pipe(prompt)):
- 输入
prompt 被分词器编码为 token IDs。
- 编码后的输入被送入模型进行前向传播,生成 logits。
- 生成逻辑(通常是贪婪搜索、束搜索或采样)根据 logits 选择下一个 token。
- 重复生成直到达到
max_new_tokens 或遇到终止条件。
- 最后,生成的 token IDs 被解码为文本输出。
整个过程涉及以下组件:
- 分词器:将文本转为 token IDs。
- 模型:执行前向传播,生成 logits。
- 生成逻辑:基于 logits 选择 token。
- 设备管理:CPU 或 GPU 的张量运算。
2. 调用栈的关键点
以下是 transformers 库中与你的代码相关的调用栈(基于 pipeline 的 text-generation 任务):
-
pipeline 初始化:
- 源码位置:
transformers/pipelines/__init__.py
pipeline 函数会根据任务类型(text-generation)选择合适的 pipeline 类(TextGenerationPipeline)。
- 源码位置:
transformers/pipelines/text_generation.py
TextGenerationPipeline 初始化时加载模型(AutoModelForCausalLM)和分词器(AutoTokenizer)。
- 源码位置:
transformers/models/auto/auto_factory.py
AutoModelForCausalLM.from_pretrained(model_id) 加载预训练模型。
- 源码位置:
transformers/modeling_utils.py
from_pretrained 方法处理模型权重加载、设备映射(device_map)和数据类型(torch_dtype)。
-
推理调用 (pipe(prompt)):
- 源码位置:
transformers/pipelines/text_generation.py
TextGenerationPipeline.__call__ 方法处理输入 prompt,调用分词器编码和模型生成。
- 源码位置:
transformers/generation/utils.py
generate 方法实现生成逻辑(如贪婪搜索、采样等)。- 它调用模型的
forward 方法(前向传播)生成 logits。
- 源码位置:
transformers/models/llama/modeling_llama.py
- 对于
Llama-3.2-1B,LlamaForCausalLM.forward 实现前向传播,计算注意力机制和 MLP 的输出。
- 源码位置:
torch/nn/modules/*
- PyTorch 的底层模块(如线性层、注意力机制)在 CPU 上执行张量运算。
-
分词器:
- 源码位置:
transformers/tokenization_utils_base.py
- 分词器的
encode 和 decode 方法处理文本到 token 的转换。
- 对于 Llama 模型,分词器通常基于
sentencepiece 或自定义实现。
-
设备和数据类型管理:
- 源码位置:
transformers/utils/generic.py 和 accelerate 库
device_map="auto" 使用 accelerate 库来分配模型权重到 CPU 或 GPU。
- 源码位置:
torch/*
- PyTorch 管理张量的数据类型(
bfloat16)和设备(CPU)。
3. 从哪里开始看源码
为了研究 LLM 在 CPU 端的推理加速,建议按照以下步骤逐步阅读源码,并关注与性能优化的相关部分:
步骤 1:从 pipeline 入手
- 文件:
transformers/pipelines/text_generation.py
- 查看
TextGenerationPipeline 的 __call__ 方法,了解如何调用分词器和模型。
- 重点关注
_forward 和 postprocess 方法,它们处理模型推理和输出解码。
- 为什么:
pipeline 是高层接口,理解它可以快速把握推理流程的全貌。
步骤 2:深入生成逻辑
- 文件:
transformers/generation/utils.py
- 查看
GenerationMixin.generate 方法,这是生成 token 的核心逻辑。
- 关注
greedy_search 或 sample 方法(取决于你的生成配置),它们控制如何从 logits 中选择 token。
- 为什么:生成逻辑涉及多次模型调用,优化这里可以显著提升性能(例如减少前向传播次数)。
步骤 3:研究模型前向传播
- 文件:
transformers/models/llama/modeling_llama.py
- 查看
LlamaForCausalLM.forward 和 LlamaModel.forward 方法。
- 关注
LlamaAttention(自注意力机制)和 LlamaMLP(前馈网络),它们是计算密集的部分。
- 为什么:模型的前向传播是推理的性能瓶颈,尤其在 CPU 上。优化注意力机制(例如使用 FlashAttention 或量化)是加速的关键。
步骤 4:检查分词器
- 文件:
transformers/models/llama/tokenization_llama.py
- 查看分词器的
encode 和 decode 方法。
- 为什么:分词器的效率对预处理和后处理有影响,尤其在处理长序列时。
步骤 5:关注设备和数据类型
- 文件:
transformers/modeling_utils.py 和 accelerate 库
- 查看
from_pretrained 如何处理 device_map 和 torch_dtype。
- 如果使用
bfloat16,检查 PyTorch 如何在 CPU 上处理该数据类型(可能需要模拟浮点运算)。
- 文件:
torch/nn/modules/*
- 查看 PyTorch 的线性层和注意力实现的底层代码。
- 为什么:CPU 上的张量运算效率直接影响推理速度。优化可能涉及使用更高效的 BLAS 库(如 MKL)或减少内存拷贝。
步骤 6:性能优化点
- 量化:
transformers 支持 8 位整数(int8)量化,查看 torch.quantization 或 bitsandbytes 集成。
- 批处理:检查
pipeline 是否支持批量推理(在 TextGenerationPipeline 中)。
- 缓存:Llama 模型使用 KV 缓存(key-value cache)加速自回归生成,查看
past_key_values 的实现。
- 外部库:如果需要更底层的优化,考虑阅读
torch 或 onnxruntime 的源码,了解 CPU 上的张量运算。
4. 推荐的阅读顺序
- 高层次:
transformers/pipelines/text_generation.py(理解 pipeline 整体流程)。
- 生成逻辑:
transformers/generation/utils.py(掌握 token 生成)。
- 模型细节:
transformers/models/llama/modeling_llama.py(深入前向传播)。
- 底层运算:
torch/nn/modules/*(优化张量计算)。
- 加速工具:
accelerate 或 bitsandbytes(研究设备管理和量化)。
5. CPU 推理加速的额外建议
- 量化:尝试使用
bitsandbytes 或 torch.int8 量化模型,减少内存占用和计算量。
- ONNX Runtime:将模型导出为 ONNX 格式,使用
onnxruntime 在 CPU 上加速推理。
- KV 缓存优化:确保 KV 缓存在 CPU 上高效存储和访问。
- 并行化:利用 PyTorch 的
torch.compile 或多线程并行化前向传播。
- Profile 性能:使用
torch.profiler 分析推理的性能瓶颈,找出耗时最多的模块。
6. 具体源码路径
以下是 Hugging Face transformers(假设使用最新版本,如 4.44.0)的关键文件路径(基于 GitHub 仓库 huggingface/transformers):
- Pipeline:
src/transformers/pipelines/text_generation.py
- 生成逻辑:
src/transformers/generation/utils.py
- Llama 模型:
src/transformers/models/llama/modeling_llama.py
- 分词器:
src/transformers/models/llama/tokenization_llama.py
- 模型加载:
src/transformers/modeling_utils.py
你可以克隆 transformers 仓库(git clone https://github.com/huggingface/transformers),然后搜索这些文件。
Summary
- 调用栈:从
pipeline.__call__ 开始,依次调用分词器(tokenizer.encode)、生成逻辑(generate)、模型前向传播(model.forward),最后解码输出(tokenizer.decode)。
- 从哪里开始:建议从
transformers/pipelines/text_generation.py 的 TextGenerationPipeline 开始,逐步深入到 generation/utils.py 和 modeling_llama.py。
- 加速重点:关注模型的注意力机制、量化支持和 KV 缓存管理,这些是 CPU 推理的瓶颈。
Pipeline
If you need to cite this post
Haibin Lai. (April 18, 2025). “LLM on CPU 推理流程python源码解析” [Blog post]. Retrieved from https://www.haibinlaiblog.top/posts/llm-on-cpu/
@online{lai-llm-on-cpu,
  title={LLM on CPU 推理流程python源码解析},
  author={Haibin Lai},
  year={2025},
  url={https://www.haibinlaiblog.top/posts/llm-on-cpu/},
}