 Haibin's blog
Compilers
gcc是如何实现OpenMP parallel for的
学习网页 本次我们主要会聚焦team.c 和loop.c: gcc/libgomp/loop.c at master · gcc-mirror/gcc gcc/libgomp/team.c at master · gcc-mirror/gcc OpenMP For Construct dynamic 调度方式实现原理和源码分析 - 一无是处的研究僧 - 博客园 TL; DR TL;DR: 大概idea就是,先分块,后并行。并行的模块我…
学习网页
本次我们主要会聚焦team.c 和loop.c: gcc/libgomp/loop.c at master · gcc-mirror/gcc gcc/libgomp/team.c at master · gcc-mirror/gcc
OpenMP For Construct dynamic 调度方式实现原理和源码分析 - 一无是处的研究僧 - 博客园
TL; DR
TL;DR: 大概idea就是,先分块,后并行。并行的模块我们上节课已经学习过了
例子与入口API
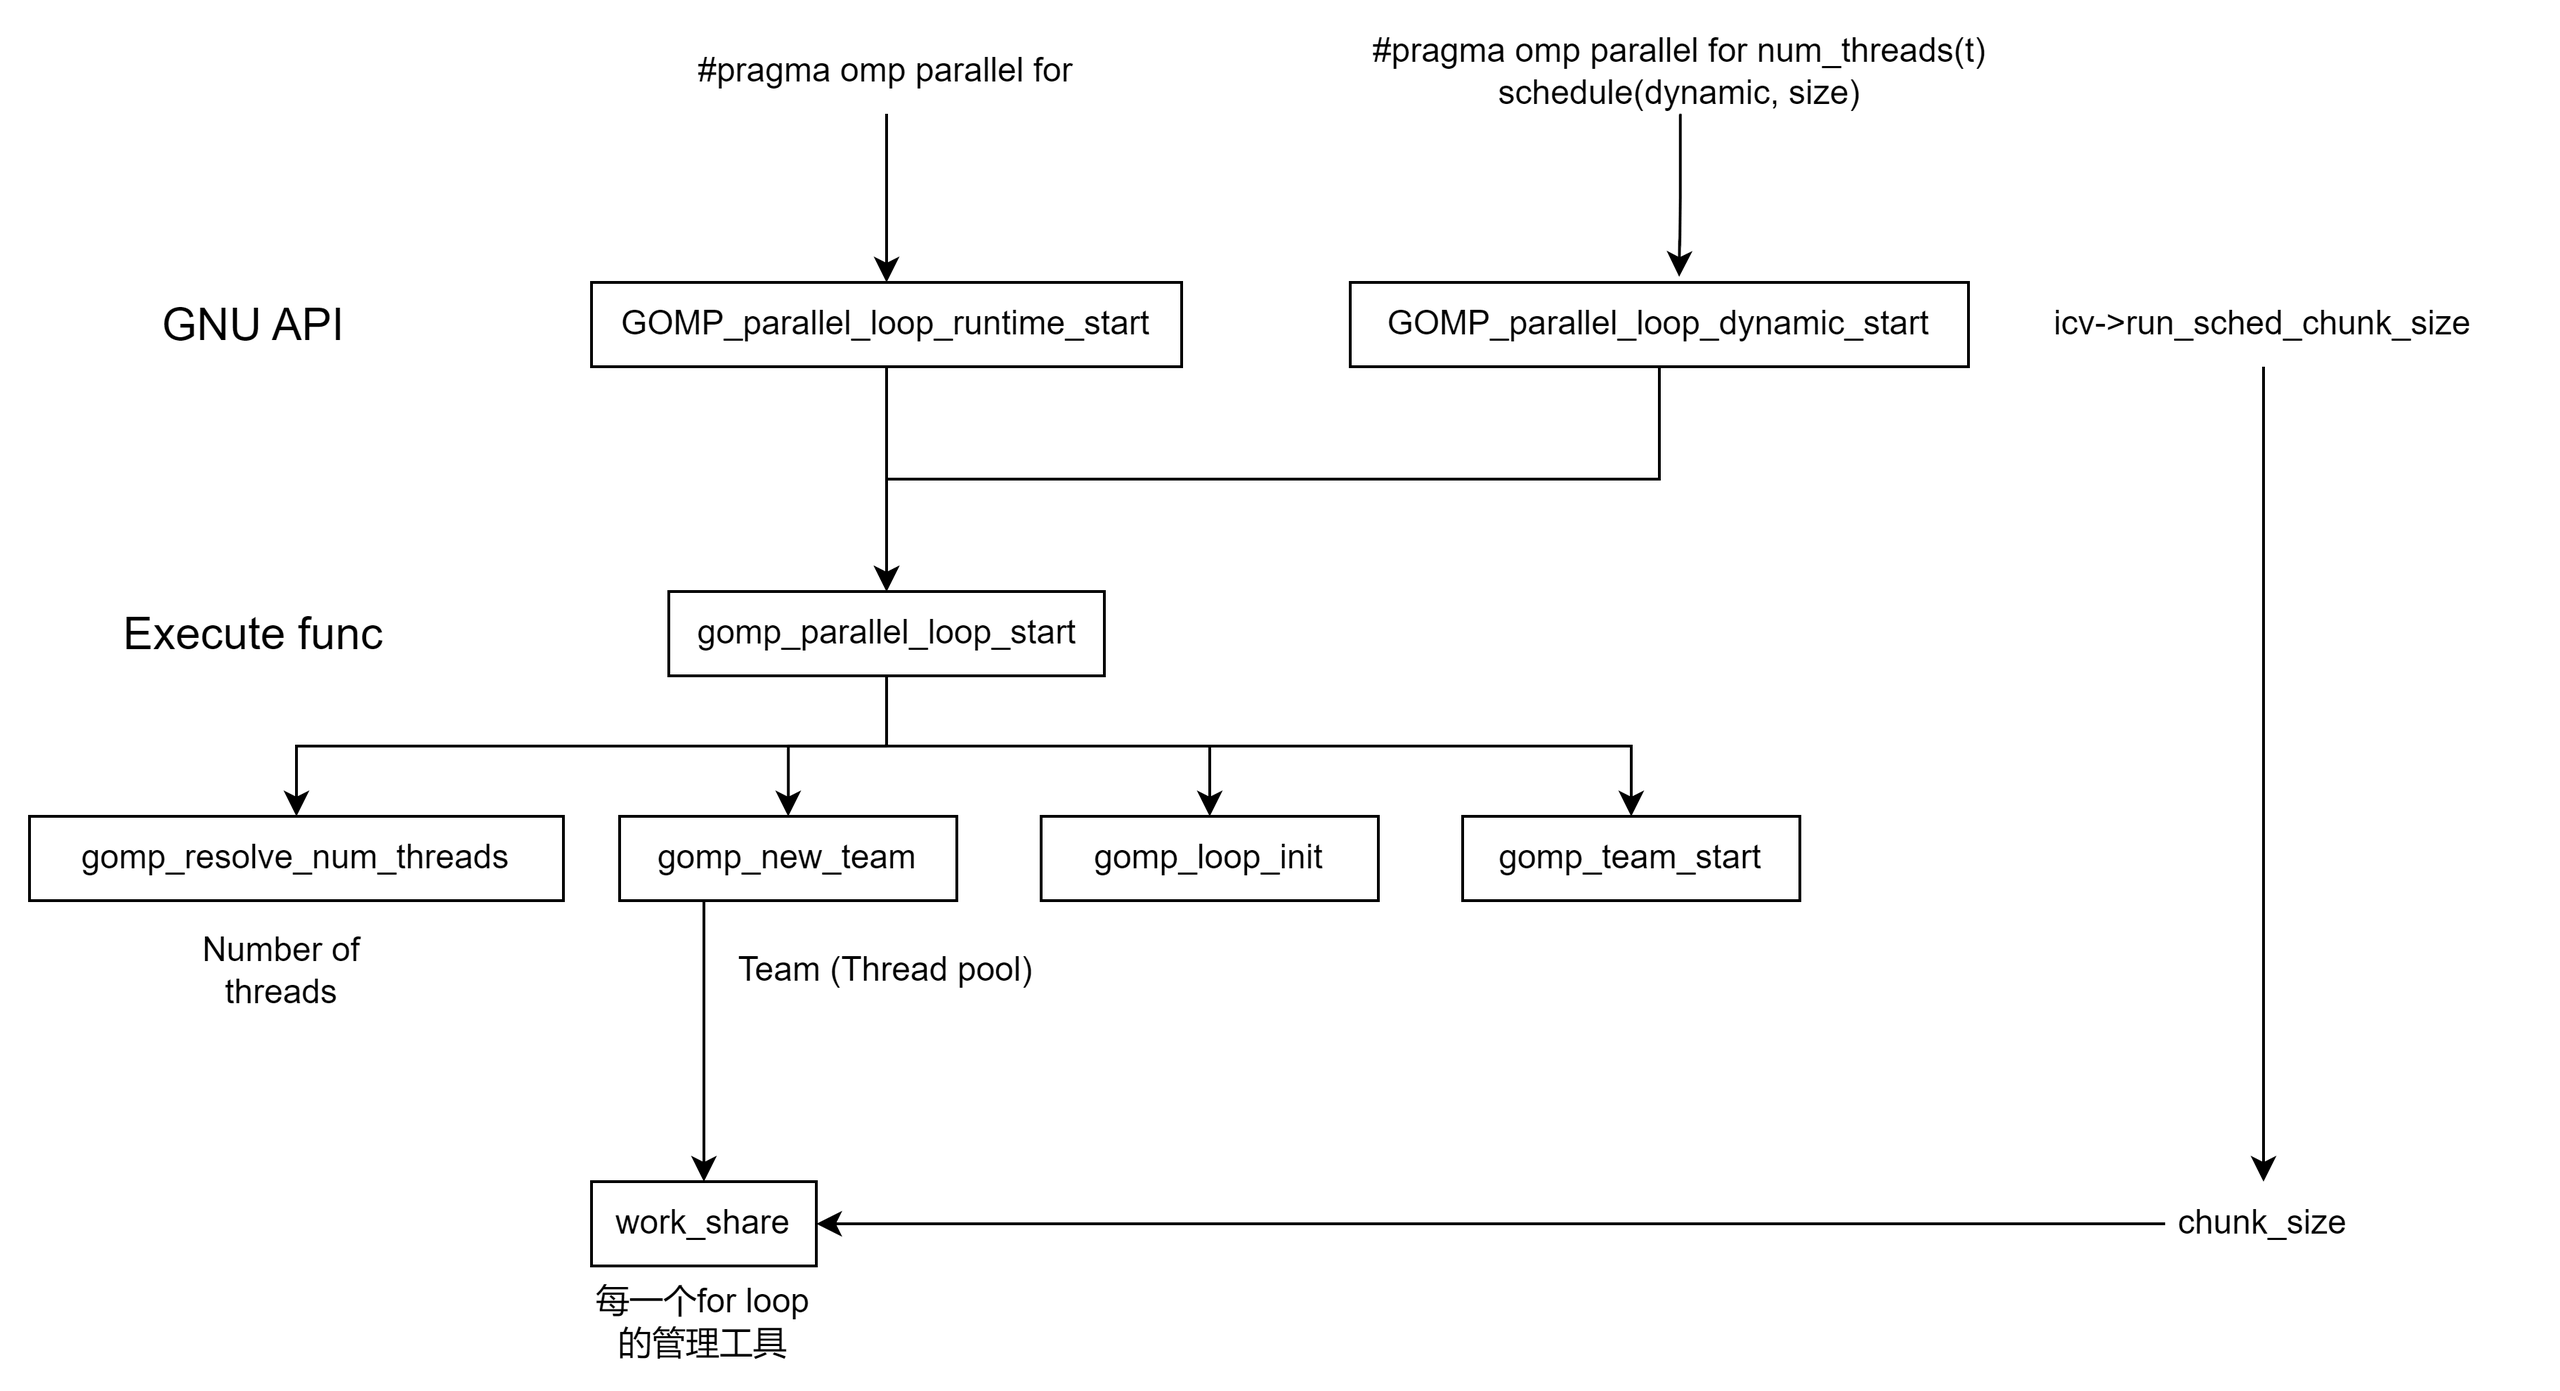
整体结构:
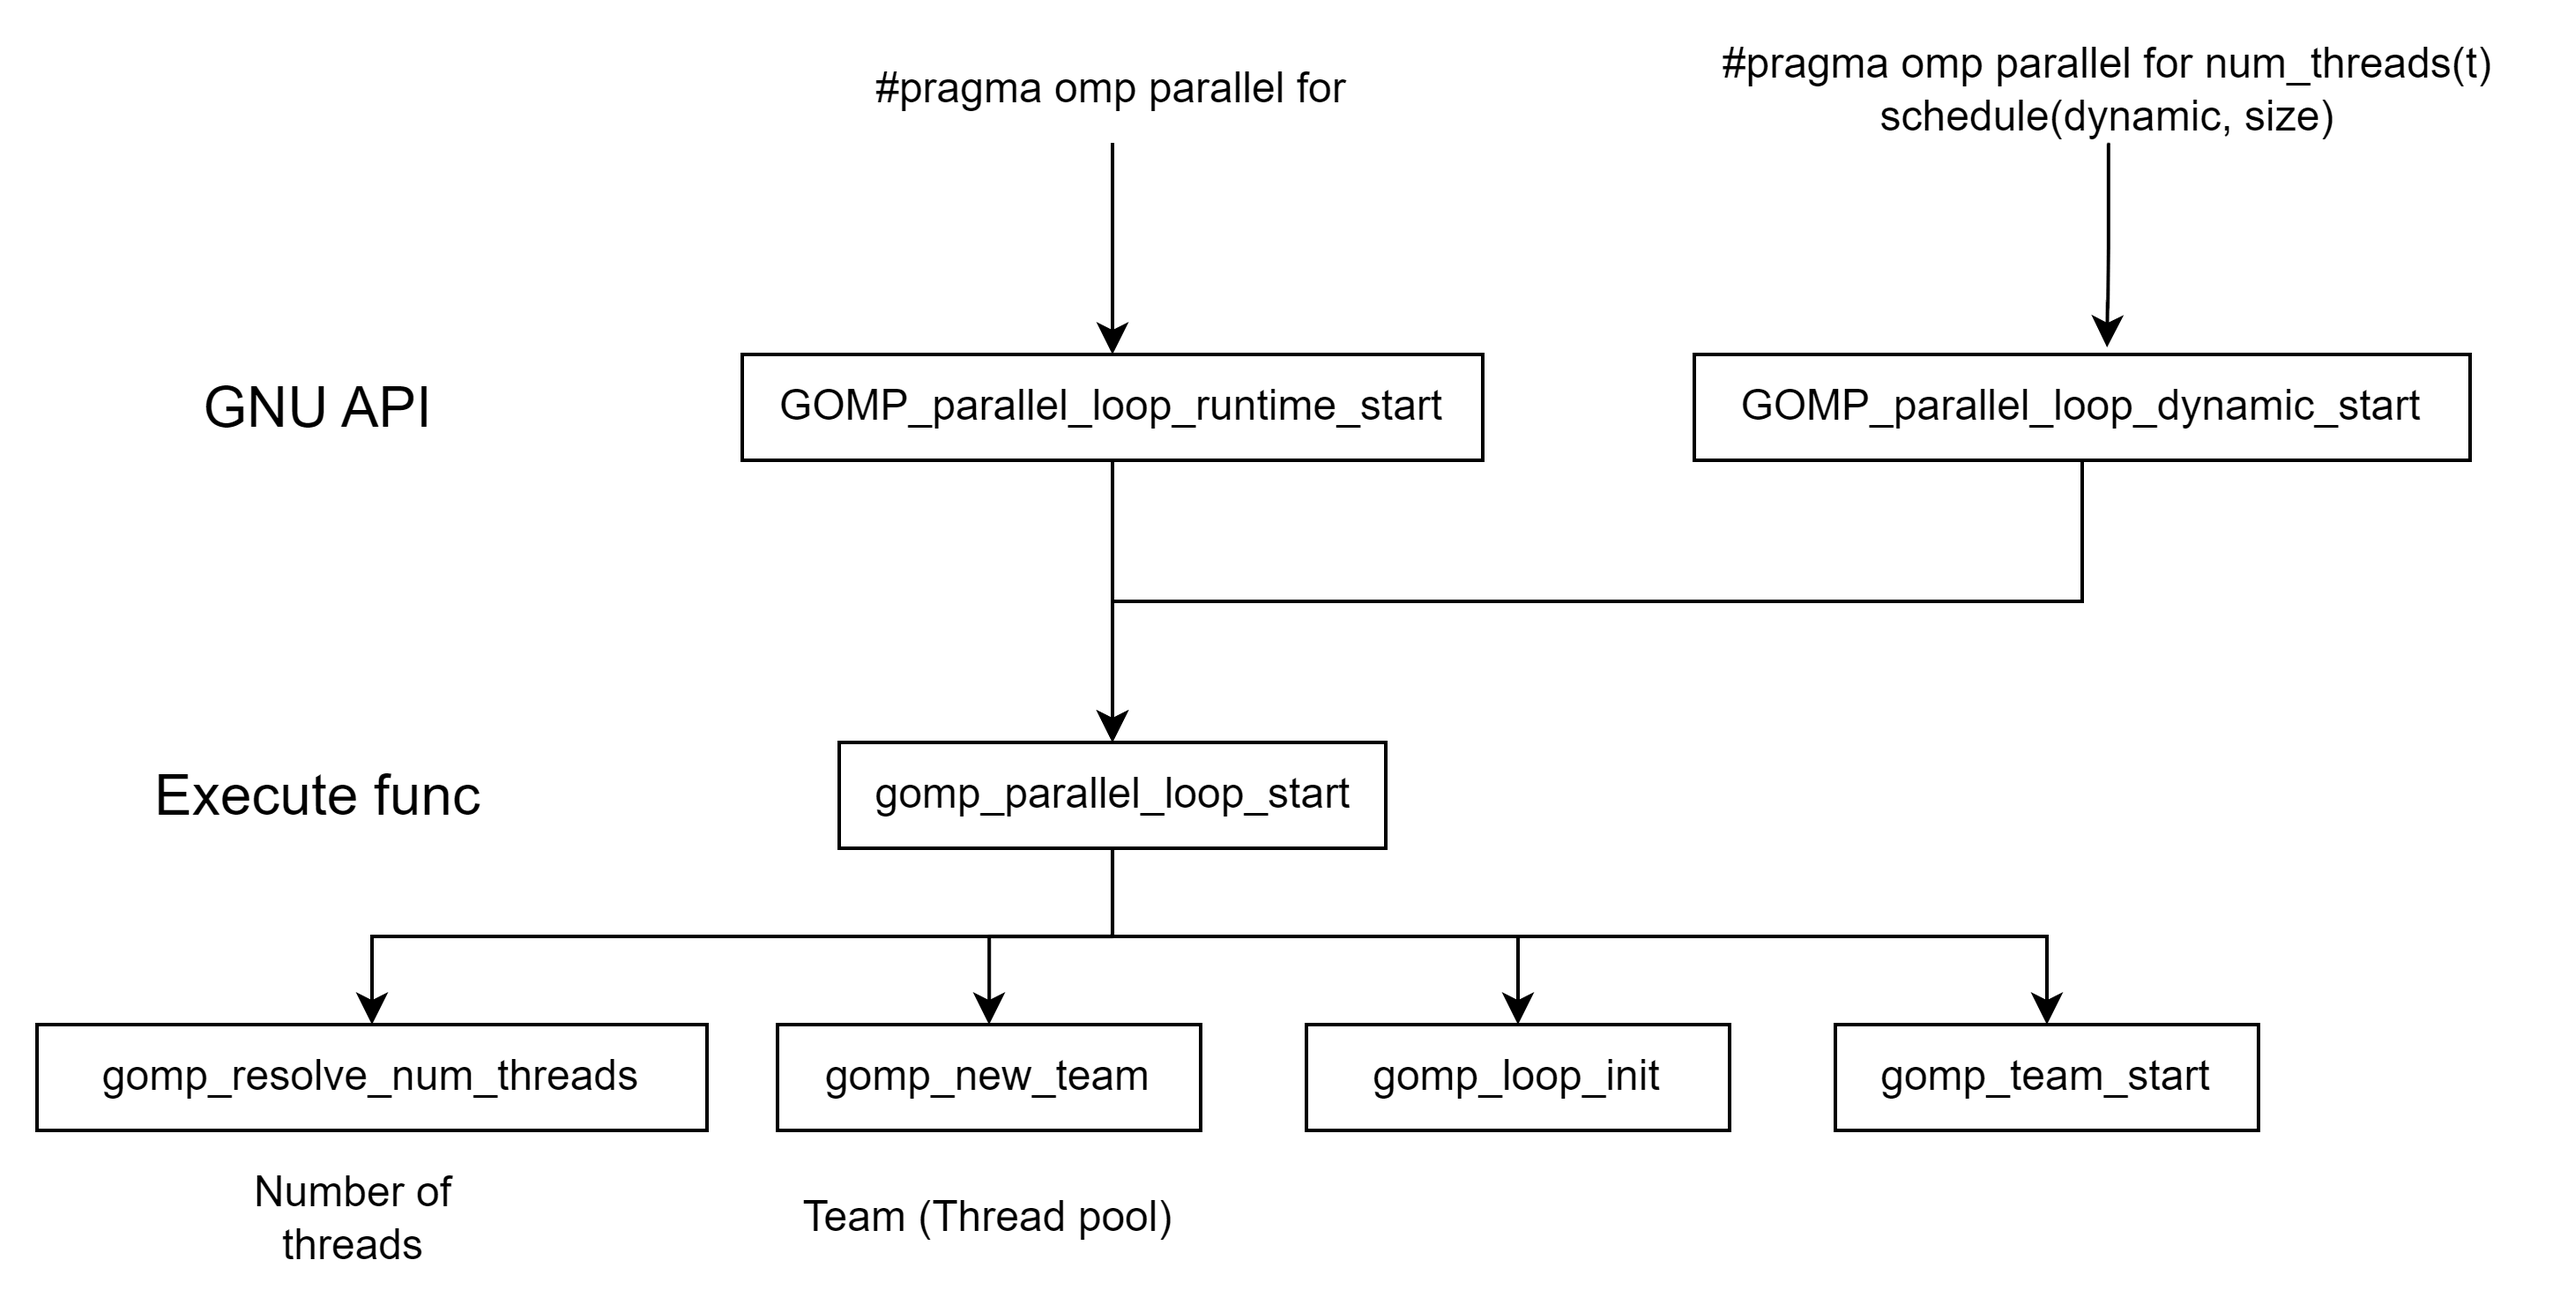 for这里主要分为两个层。API层和Execute func层。GCC在看到你的代码后,会在API层里选择适合你的代码的API层。随后他们将统一调动execute func层,其内部又有多层的逻辑(后面会分析)。
我们先从cpp的matmul讲起
#include <omp.h> #include <iostream> #include <vector>void matrix_multiply(const std::vector<std::vector<double>>& A, const std::vector<std::vector<double>>& B, std::vector<std::vector<double>>& C, int rows_A, int cols_A, int cols_B) { #pragma omp parallel for for (int i = 0; i < rows_A; ++i) { for (int j = 0; j < cols_B; ++j) { double sum = 0.0; for (int k = 0; k < cols_A; ++k) { sum += A[i][k] * B[k][j]; } C[i][j] = sum; } } }
int main() { int rows_A = 100, cols_A = 100, cols_B = 100; std::vector<std::vector<double>> A(rows_A, std::vector<double>(cols_A, 1.0)); std::vector<std::vector<double>> B(cols_A, std::vector<double>(cols_B, 1.0)); std::vector<std::vector<double>> C(rows_A, std::vector<double>(cols_B, 0.0));
double start_time = omp_get_wtime(); matrix_multiply(A, B, C, rows_A, cols_A, cols_B); double end_time = omp_get_wtime(); std::cout << "Time taken: " << end_time - start_time << " seconds\n"; return 0;
}
循环虽然外部写了循环100次,但是内部 for (int i = 0; i < rows_A; ++i) for (int j = 0; j < cols_B; ++j)没有写的情况下,大部分时候编译器会认为这是运行时决定,会把这个for 变为 GOMP_parallel_loop_runtime_start (欢迎大家debug)(就算不是也没关系,其他的几个实现都是大同小易的):
void
GOMP_parallel_loop_runtime_start (void (*fn) (void *), void *data,
                  unsigned num_threads, long start, long end,
                  long incr)
{
  struct gomp_task_icv *icv = gomp_icv (false);
  gomp_parallel_loop_start (fn, data, num_threads, start, end, incr,
                icv->run_sched_var & ~GFS_MONOTONIC,
                icv->run_sched_chunk_size, 0);
}
这只是一个暴露在外的API(icv上节课也讲了,是debug标记)。其内部实现是:
/* The GOMP_parallel_loop_* routines pre-initialize a work-share construct to avoid one synchronization once we get into the loop. */static void gomp_parallel_loop_start (void (*fn) (void *), void *data, unsigned num_threads, long start, long end, long incr, enum gomp_schedule_type sched, long chunk_size, unsigned int flags) { struct gomp_team *team;
num_threads = gomp_resolve_num_threads (num_threads, 0); team = gomp_new_team (num_threads); gomp_loop_init (&team->work_shares[0], start, end, incr, sched, chunk_size); gomp_team_start (fn, data, num_threads, flags, team, NULL); }
我们看到这段有这么几个流程:
- 确定线程数
gomp_resolve_num_threads(num_threads, 0) - 创建team(并行域内的线程组)
gomp_new_team (num_threads) - 划分数据
gomp_loop_init (&team->work_shares[0], start, end, incr, sched, chunk_size) - 启动线程
gomp_team_start (fn, data, num_threads, flags, team, NULL)
我们在上集已经解说了 确定线程数和启动线程 这两个函数,大家看完后大概就能对这两个函数能理解了 gcc是怎么实现OpenMP的? - 知乎。简单来说,他们的逻辑就是:
- 线程数由我们自己输入(N)确定或者由系统最大的线程数量确定
- 启动线程时,是用一个for循环,不停pthread_create创建线程,每个新线程将执行我们的并行函数(这里这个并行函数叫subfunction)
那我们继续,在此之前,我们回顾一下team的结构,which 我们已经在上集解说了 。但我们可以再复习一遍:
struct gomp_taskgroup
{
  _Bool in_taskgroup_wait;
  int num_children;
} l;
struct gomp_team
{
  int task_queue;
  int task_running_count;
};
struct gomp_thread
{
  struct gomp_team_state ts;
  struct gomp_task task;
} extern __thread a;
enum gomp_schedule_type
{
GFS_RUNTIME, // runtime 调度方式
GFS_STATIC,    // static  调度方式
GFS_DYNAMIC, // dynamic 调度方式
GFS_GUIDED,    // guided  调度方式
GFS_AUTO     // auto    调度方式
};
struct gomp_team 是 OpenMP 用来表示一个 并行区域内线程组(team) 的数据结构,它记录了所有线程的公共状态,如:
- 所有线程共享的循环调度信息(work_share)
- tasking 状态(task_queue、task_running_count)
- barrier、lock、cancel 状态等同步信息
每次你执行#pragma omp parallel num_threads(N),OpenMP 就会创建一个新的 gomp_team 对象,并把当前线程(通常是主线程)和新创建的工作线程组织成一个 team。(听起来很像CUDA里warp的概念)
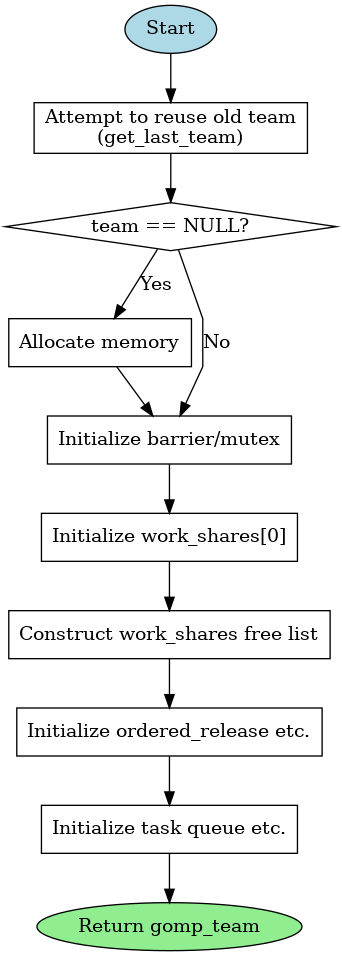
接下来我们看看OpenMP是怎么创建team的,我把注释表在下面了(部分基于GPT4o):
/* Create a new team data structure. */struct gomp_team * gomp_new_team (unsigned nthreads) { struct gomp_team *team; int i;
team = get_last_team (nthreads); // 尝试复用已有 team(线程池复用),节省开销。
// 若没有可复用的 team,就用堆分配新内存(注意末尾为每线程附加结构预留了空间) if (team == NULL) { size_t extra = sizeof (team->ordered_release[0]) + sizeof (team->implicit_task[0]); //
ordered_release[]:用于支持#pragma omp ordered,implicit_task[]:每个线程的默认 task #ifdef GOMP_USE_ALIGNED_WORK_SHARES team = gomp_aligned_alloc (__alignof (struct gomp_team), sizeof (*team) + nthreads * extra);#else team = team_malloc (sizeof (*team) + nthreads * extra); #endif
// 初始化用于线程同步的 barrier 和锁 #ifndef HAVE_SYNC_BUILTINS gomp_mutex_init (&team->work_share_list_free_lock); #endif gomp_barrier_init (&team->barrier, nthreads); gomp_mutex_init (&team->task_lock);
team->nthreads = nthreads; }// - 初始化主线程的循环分配结构
work_shares[0]。 //work_shares_to_free指向当前活动的 work_share。 team->work_share_chunk = 8; #ifdef HAVE_SYNC_BUILTINS team->single_count = 0; #endif team->work_shares_to_free = &team->work_shares[0]; gomp_init_work_share (&team->work_shares[0], 0, nthreads);team->work_shares[0].next_alloc = NULL; team->work_share_list_free = NULL;
// - 构建一个简单的 free list 池,用于后续分配嵌套循环时快速分配新的
work_share。 team->work_share_list_alloc = &team->work_shares[1]; for (i = 1; i < 7; i++) team->work_shares[i].next_free = &team->work_shares[i + 1]; team->work_shares[i].next_free = NULL;// 初始化
ordered结构,供#pragma omp ordered使用。 gomp_sem_init (&team->master_release, 0); team->ordered_release = (void *) &team->implicit_task[nthreads]; team->ordered_release[0] = &team->master_release;// 初始化任务队列和任务状态计数器,为 task 构造器准备好。 priority_queue_init (&team->task_queue); team->task_count = 0; team->task_queued_count = 0; team->task_running_count = 0; team->work_share_cancelled = 0; team->team_cancelled = 0;
team->task_detach_count = 0;
return team; }
OpenMP 运行时会调用这个函数,为当前并行区域的执行准备所有共享状态,包括:
- 线程数量
- 工作划分信息
- barrier 和锁
- task 队列
- ordered 结构
- 工作共享结构 work_shares(用于 for 循环)
下面是这个函数的调用逻辑
- reuse old team / 新建 new team
- 初始化锁(后续同步会使用)
- 初始化 work shares
- 创建task queues
| 字段 | 含义 |
|---|---|
work_shares |
gomp_team 中保存 for 循环调度信息的缓存数组 |
gomp_work_share |
描述某一个 for 循环的调度状态:范围、策略、当前进度等 |
team->work_shares[0] |
当前 active 并行 for 循环对应的调度器 |
| 使用方式 | 每个线程在执行前调用 GOMP_loop_*_next() 从中获取 chunk |
work_share
Libgomp: gomp_work_share Struct Reference
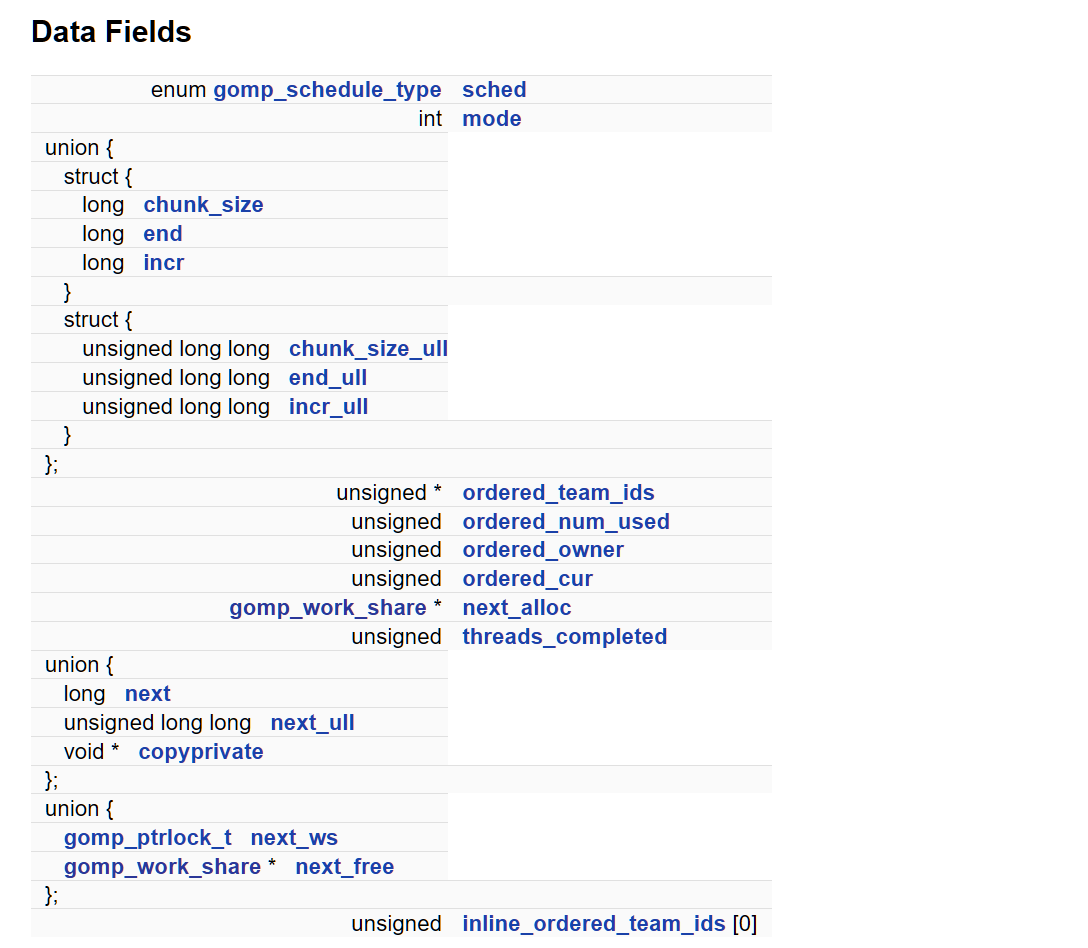
在 libgomp 中,work_share 是一个用于协调线程间工作划分的数据结构。
当你使用 #pragma omp for 等语句时,OpenMP 会创建一个 work_share 结构体,它记录循环的区间、步长、调度策略等内容,供所有线程共享,实现合理分工与同步。
在并行循环中,我们要把一个大的迭代区间分给多个线程执行。
这个分工要满足几个要求:
- 线程不能抢重复任务
- 支持不同调度策略(static/dynamic/guided)
- 能检测循环是否结束
- 支持有序执行(ordered)
所以,OpenMP 为每一个 parallel for 语句都构造一个 gomp_work_share,用它来协调线程之间的分工和同步。
struct gomp_work_share { /* This member records the SCHEDULE clause to be used for this construct. The user specification of "runtime" will already have been resolved. If this is a SECTIONS construct, this value will always be DYNAMIC. */ enum gomp_schedule_type sched;int mode;
union { struct { /* This is the chunk_size argument to the SCHEDULE clause. / long chunk_size; / This is the iteration end point. If this is a SECTIONS construct, this is the number of contained sections. / long end; / This is the iteration step. If this is a SECTIONS construct, this is always 1. */ long incr; };
struct { unsigned long long chunk_size_ull; unsigned long long end_ull; unsigned long long incr_ull; };};
union { unsigned *ordered_team_ids; struct gomp_doacross_work_share *doacross; };
/* This is the number of threads that have registered themselves in the circular queue ordered_team_ids. */ unsigned ordered_num_used;
/* This is the team_id of the currently acknowledged owner of the ordered section, or -1u if the ordered section has not been acknowledged by any thread. This is distinguished from the thread that is allowed to take the section next. */ unsigned ordered_owner; unsigned ordered_cur;
/* This is a chain of allocated gomp_work_share blocks, valid only in the first gomp_work_share struct in the block. */ struct gomp_work_share *next_alloc;
/* This lock protects the update of the following members. */ #ifdef GOMP_USE_ALIGNED_WORK_SHARES gomp_mutex_t lock attribute((aligned (64))); #else char pad[64 - offsetof (struct gomp_work_share_1st_cacheline, pad)]; gomp_mutex_t lock; #endif
/* This is the count of the number of threads that have exited the work share construct. If the construct was marked nowait, they have moved on to other work; otherwise they’re blocked on a barrier. The last member of the team to exit the work share construct must deallocate it. */ unsigned threads_completed;
union { /* This is the next iteration value to be allocated. */ long next; unsigned long long next_ull; void *copyprivate; };
union { gomp_ptrlock_t next_ws; struct gomp_work_share *next_free; };
uintptr_t *task_reductions; unsigned inline_ordered_team_ids[0]; };
字段解释:
首先是主角:
struct gomp_work_share它表示 一个工作共享(work-sharing)构造的状态,比如:
#pragma omp for#pragma omp sections#pragma omp single
每个 parallel 区域内的工作共享语句会对应创建一个这样的结构,供 team 中所有线程共享。它控制任务分配、同步(如 ordered)、调度策略等。
1️⃣ 调度信息相关
enum gomp_schedule_type sched;
int mode;sched: 调度策略,如static,dynamic,guided等。-
mode: 一般用于标志当前的执行模式,例如 ordered/nowait 启用情况。2️⃣ 迭代参数
union {
  struct {
    long chunk_size;
    long end;
    long incr;
  };
  struct {
    unsigned long long chunk_size_ull;
    unsigned long long end_ull;
    unsigned long long incr_ull;
  };
};- 存储循环的基本信息:chunk 大小、终止条件、增量
-
使用
union是为了支持long与unsigned long long两种精度循环3️⃣
ordered相关同步机制
union {
  unsigned *ordered_team_ids;
  struct gomp_doacross_work_share *doacross;
};
unsigned ordered_num_used;
unsigned ordered_owner;
unsigned ordered_cur;
这些字段用于 ordered 区块的线程顺序控制:
ordered_team_ids: 环形队列,记录哪些线程进入过 ordered 区块ordered_owner: 当前“被认可”的线程 IDordered_cur: 当前应该进入 ordered 区块的线程位置doacross: 是 OpenMP 5.0 引入的跨迭代依赖控制(不常用)
4️⃣ work share 内存管理链表
struct gomp_work_share *next_alloc;- 用于连接一批
gomp_work_share,每次for语句进入都会新建一个。 - 每个
team通常维护一个work_shares[]数组做池化。
5️⃣ 锁 + 线程完成计数
gomp_mutex_t lock;
unsigned threads_completed;lock: 控制访问如next等共享字段,防止数据竞争-
threads_completed: 统计完成循环的线程数- 如果不是
nowait,就等所有线程结束后回收资源
6️⃣ 迭代分配/Copyprivate 数据
- 如果不是
union {
  long next;
  unsigned long long next_ull;
  void *copyprivate;
};next/next_ull: 下一个待分配的迭代值(用于 dynamic、guided)-
copyprivate: 用于single copyprivate的数据传递7️⃣ 链接字段(下一个工作共享)
union {
  gomp_ptrlock_t next_ws;
  struct gomp_work_share *next_free;
};next_ws: 链接下一个work_share(同一个线程块里的多个循环)-
next_free: 表示这个结构回收到 free list 中8️⃣ 任务归约与 inline ordered cache
uintptr_t *task_reductions;
unsigned inline_ordered_team_ids[0];task_reductions: 支持task reduction特性(OpenMP 4.0+)inline_ordered_team_ids[0]: 小 team 可以用这个数组避免动态分配
| 功能 | 字段 |
|---|---|
| 调度策略控制 | sched, chunk_size, end |
| 任务划分迭代控制 | next, incr |
| ordered 执行支持 | ordered_team_ids, ordered_owner 等 |
| 同步与线程完成 | lock, threads_completed |
| 结构生命周期管理 | next_alloc, next_ws |
| 高效内存布局 | inline_ordered_team_ids[0] |
总结(for work_share)
在 OpenMP 的并行区域中,当执行到一个 #pragma omp for 语句时,GCC 的 libgomp 会为这个 for 循环分配并初始化一个新的 gomp_work_share 结构体,用于:
- 保存这个循环的调度方式(schedule)
- 保存迭代范围(start, end, increment)
- 保存 chunk 大小(chunk_size)
- 管理
next字段,用于多个线程领取迭代任务 - 管理 ordered 区域的执行顺序
- 管理 task reduction(如果有)
- 跟踪有多少线程完成了工作共享块
- 链接下一个 work_share
| 特性 | gomp_work_share 的作用 |
|---|---|
| 一对一 | 每个 #pragma omp for → 一个 gomp_work_share |
| 多线程共享 | 所有线程都访问这个结构体分配任务 |
| 生命周期 | 循环执行完后被最后一个线程释放或缓存 |
举个例子:
#pragma omp parallel
{
    #pragma omp for schedule(dynamic)
    for (int i = 0; i < 1000; ++i)
        work(i);
}- 当线程进入
#pragma omp for,调用GOMP_parallel_loop_start()或GOMP_loop_runtime_start(); - 然后会通过
gomp_loop_init()创建并初始化一个新的gomp_work_share; - 所有线程通过这个共享的
work_share结构体,从next处动态领取迭代区间。
举2个例子:
#pragma omp parallel { #pragma omp for for (int i = 0; i < 100; ++i) { ... }#pragma omp for for (int j = 0; j < 200; ++j) { ... }
}
- 这里会创建 两个独立的
gomp_work_share实例; - 它们通过
team->work_share_list_alloc和work_shares[i].next_alloc进行管理和缓存复用。
loop init
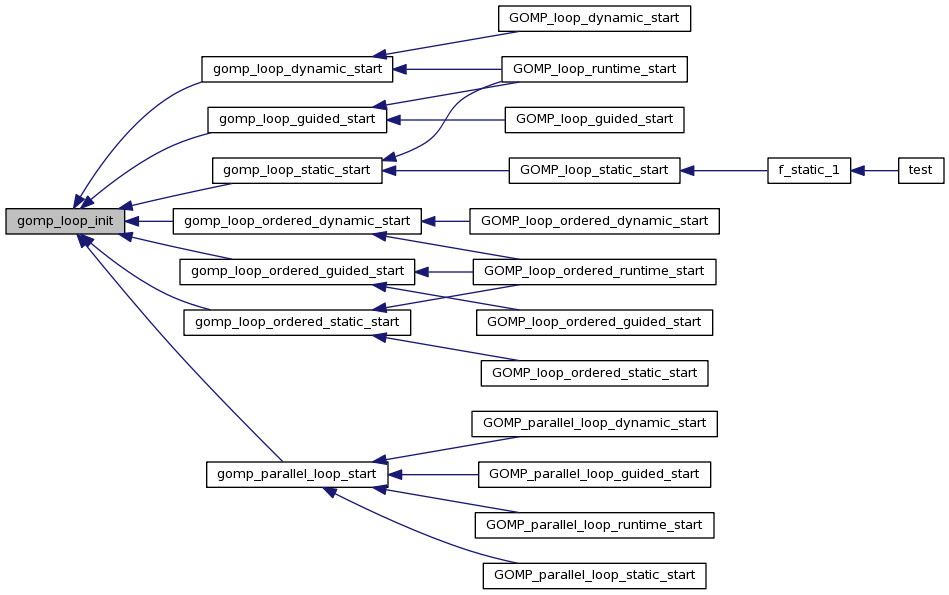
在我们初始化work_share的配置后,接下来我们就要对loop 初始化了。具体大家看源码及注释。 我们这里的重点是,初始化了chunk_size
详细解析见 dynamic 调度方式分析 一节: OpenMP For Construct dynamic 调度方式实现原理和源码分析 - 一无是处的研究僧 - 博客园
/* Initialize the given work share construct from the given arguments. */static inline void gomp_loop_init (struct gomp_work_share *ws, long start, long end, long incr, enum gomp_schedule_type sched, long chunk_size) { // 1.设置调度方式和循环参数 ws->sched = sched; ws->chunk_size = chunk_size; // 在这里初始化了chunk_size
// 2. 处理循环是否为空(Zero Iteration) ws->end = ((incr > 0 && start > end) || (incr < 0 && start < end)) ? start : end; // 3.设置步长和下一个迭代开始点 ws->incr = incr; ws->next = start;
// 4. 如果是 dynamic 调度,还要处理 chunk 和溢出保护 if (sched == GFS_DYNAMIC) { ws->chunk_size *= incr;
#ifdef HAVE_SYNC_BUILTINS { /* For dynamic scheduling prepare things to make each iteration faster. */ struct gomp_thread *thr = gomp_thread (); struct gomp_team *team = thr->ts.team; long nthreads = team ? team->nthreads : 1;
if (__builtin_expect (incr > 0, 1)) { /* Cheap overflow protection. */ if (__builtin_expect ((nthreads | ws->chunk_size) >= 1UL << (sizeof (long) * __CHAR_BIT__ / 2 - 1), 0)) ws->mode = 0; else ws->mode = ws->end < (LONG_MAX - (nthreads + 1) * ws->chunk_size); } /* Cheap overflow protection. */ else if (__builtin_expect ((nthreads | -ws->chunk_size) >= 1UL << (sizeof (long) * __CHAR_BIT__ / 2 - 1), 0)) ws->mode = 0; else ws->mode = ws->end > (nthreads + 1) * -ws->chunk_size - LONG_MAX; }
#endif } }
一句话总结就是:
gomp_loop_init() 就是把 for 循环的调度信息(start/end/incr/sched/chunk)规范化并填入 work_share 结构体,供后面多个线程安全、快速地并发领取迭代区间使用。
举个例子:
比如你写的代码是:
#pragma omp parallel for schedule(dynamic, 5)
for (int i = 0; i < 20; ++i)
  work(i);
进入并行区域后会发生:
-
调用
gomp_new_team()分配 team; -
team 中的
work_shares[0]被gomp_loop_init()初始化为:ws->sched = GFS_DYNAMIC ws->chunk_size = 5 ws->incr = 1 ws->next = 0 ws->end = 20 -
后续多个线程竞争性从
ws->next开始领取chunk_size大小的区间; -
ws->mode如果满足条件,则动态领取时会走快速路径。
如果不写chunk_size,这边应该是多少?
不同的调度不一样
| 调度方式(schedule) | 默认 chunk_size |
说明 |
|---|---|---|
static |
自动均分整个迭代空间 | 编译时根据线程数 n 和总迭代数 N 直接分成 n 份 |
dynamic |
chunk_size = 1 |
每个线程每次领取 1 个迭代 |
guided |
动态变化(见下面) | 初始大块,逐渐缩小 |
auto/runtime |
取决于运行时设置 | 环境变量或实现默认值 |
对于dynamic调度
这里以 schedule(dynamic, chunk_size) 为例,看看线程是如何处理 chunk 的:
(1)共享数据结构:gomp_work_share
-
所有线程共享一个
gomp_work_share ws; -
ws->next是一个原子变量,表示“下一次可以被领取的起点”。(2)每个线程执行时,会调用
gomp_iter_dynamic_next这个函数会: -
加锁(或用 atomic 操作)读取
ws->next; -
给当前线程分配一段区间
[start, start + chunk_size); -
然后更新
ws->next += chunk_size; -
如果超出
ws->end,说明任务全部分配完了,线程就退出循环。
(3)例子:schedule(dynamic, 3)
#pragma omp parallel for schedule(dynamic, 3)
for (int i = 0; i < 10; ++i)
  work(i);
线程领取过程如下(假设 3 个线程):
| 第几次领取 | 线程 ID | 获得区间 | next 更新为 |
|---|---|---|---|
| 1 | T0 | [0, 3) | 3 |
| 2 | T1 | [3, 6) | 6 |
| 3 | T2 | [6, 9) | 9 |
| 4 | T0 | [9, 10) | 10 |
注意:最后一段可能不足 chunk_size,线程会自动裁剪。
✅ 总结一下
-
如果你不指定
chunk_size,那:static:默认均分;dynamic:默认chunk_size = 1;
-
chunk 是每个线程从共享的
gomp_work_share中动态“抢”出来的; -
抢任务的函数最终是通过
gomp_iter_dynamic_next()类似函数完成的; -
为了加速这种调度,OpenMP 实现(如 libgomp)会为 dynamic 准备 fast path(比如
ws->mode)避免频繁加锁。
但如果是 schedule(static),就不是这样了!
不加锁、不抢任务,原因是:
- 静态分配意味着 每个线程在一开始就知道它自己的任务区间;
- 所以根本 不需要共享更新
ws->next,也就 不需要加锁; work_share在这里的作用是存储共享参数(例如start/end/incr),但每个线程的起始索引是 预先计算好的。
调度总结
| 调度方式 | 是否加锁 | 是否动态更新 ws->next |
线程何时知道任务区间 |
|---|---|---|---|
static |
❌ 否 | ❌ 否 | ✅ 编译/运行时立即知道 |
static,chunk |
❌ 否 | ❌ 否 | ✅ 由 tid 和 chunk 算出 |
dynamic |
✅ 是 | ✅ 是 | ⏳ 运行时从 work_share 领取 |
guided |
✅ 是 | ✅ 是 | ⏳ 每次都动态计算领取大小 |
示例(static vs dynamic)
schedule(static, 2),4线程:
#pragma omp parallel for schedule(static, 2)
for (int i = 0; i < 8; ++i)
work(i);| 线程 ID | 分配的迭代(静态) |
|---|---|
| T0 | i = 0,1 |
| T1 | i = 2,3 |
| T2 | i = 4,5 |
| T3 | i = 6,7 |
🟢 每个线程一启动就知道要干哪两项,直接干,不抢任务、不加锁。
schedule(dynamic, 2),4线程:
#pragma omp parallel for schedule(dynamic, 2)
for (int i = 0; i < 8; ++i)
work(i);| 步骤 | 哪个线程拿了哪个 chunk | next |
|---|---|---|
| 1 | T0 拿到 i = 0,1 | 2 |
| 2 | T1 拿到 i = 2,3 | 4 |
| 3 | T2 拿到 i = 4,5 | 6 |
| 4 | T3 拿到 i = 6,7 | 8 |
🟡 每个线程在干完后要加锁或原子操作更新 next。
gomp_iter_dynamic_next
gcc/libgomp/iter.c at 02a6f9a0df149bbc06e3bbb20be4dde199225296 · gcc-mirror/gcc
这里是对dynamic调用的学习(static的就直接是静态分配了)
这个函数的目的是:
在
schedule(dynamic)模式下,每个线程调用它来 从gomp_work_share结构中领取下一个可用的迭代区间(start, end)。
线程之间通过原子操作来并发更新 ws->next,确保不会重复领取任务。
这里的函数流程图大致可以看为:
Input: gomp_work_share ws (包含 end, chunk, incr, mode, next)▼ 是否开启快速模式? (ws->mode) ▼ Yes No ▼ ▼
原子加 chunk,获得 tmp 使用 CAS 死循环尝试更新 ws->next ▼ ▼ if tmp >= end if 成功更新 ▼ ▼ return false 设置 *pstart = start ▼ 设置 *pend = nend else return true 设置 *pstart = tmp 设置 *pend = min(tmp + chunk, end) return true
bool
gomp_iter_dynamic_next (long *pstart, long *pend)
{
  struct gomp_thread *thr = gomp_thread ();
  struct gomp_work_share *ws = thr->ts.work_share;
  long start, end, nend, chunk, incr;

  end = ws->end;
  incr = ws->incr;
  chunk = ws->chunk_size;

  if (__builtin_expect (ws->mode, 1))
    {
    // 可以使用 `__sync_fetch_and_add` 进行快速原子加法,这种模式非常快。
      long tmp = __sync_fetch_and_add (&ws->next, chunk);
      if (incr > 0){
          if (tmp >= end)
            return false;
          nend = tmp + chunk;
          if (nend > end)
            nend = end;
          *pstart = tmp;
          *pend = nend;
          return true;
      }
      else{
          if (tmp <= end)
            return false;
          nend = tmp + chunk;
          if (nend < end)
            nend = end;
          *pstart = tmp;
          *pend = nend;
          return true;
      }
    }

// `mode = 0`:说明有可能涉及到整型溢出,要使用较慢的 CAS 死循环逻辑,手动比较并交换 `ws->next`。
  start = __atomic_load_n (&ws->next, MEMMODEL_RELAXED);
  while (1)
    {
      long left = end - start;
      long tmp;

      if (start == end)
    return false;

      if (incr < 0)
    {
      if (chunk < left)
        chunk = left;
    }
      else
    {
      if (chunk > left)
        chunk = left;
    }
      nend = start + chunk;

      tmp = __sync_val_compare_and_swap (&ws->next, start, nend);
      if (__builtin_expect (tmp == start, 1))
    break;

      start = tmp;
    }

  *pstart = start;
  *pend = nend;
  return true;
}
#endif /* HAVE_SYNC_BUILTINS */| 变量名 | 含义 |
|---|---|
ws->next |
当前尚未被线程领取的迭代起点(线程通过它来“抢任务”) |
chunk |
每次领取的任务块大小 |
incr |
步长(正负表示正向或逆向迭代) |
mode |
表示是否可以走“快速路径”(前提是没有溢出风险) |
pstart/pend |
输出参数,线程拿到的 [start, end) 区间 |
线程同步靠什么?
ws->next是核心状态变量- 所有线程共享它
- 使用
__sync_fetch_and_add或__sync_val_compare_and_swap来实现原子更新
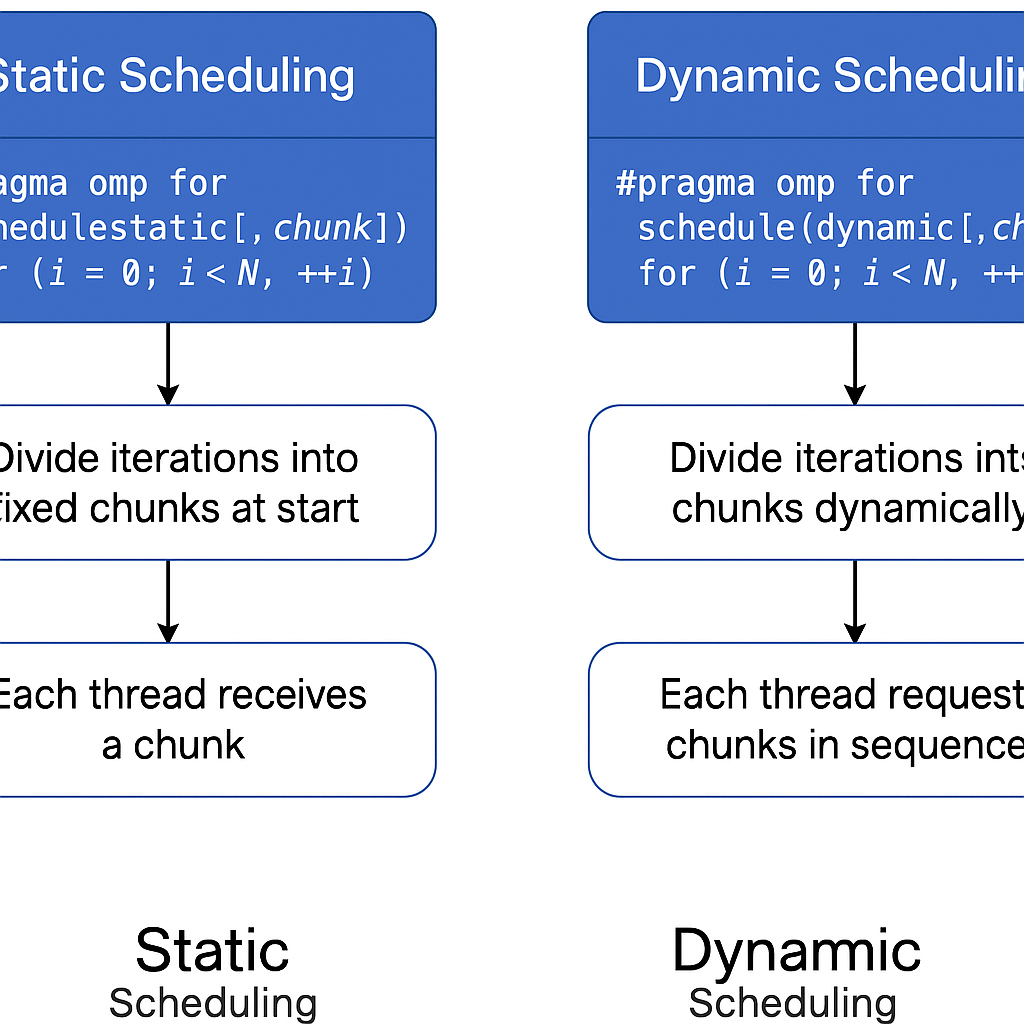
| 特性 | static | dynamic |
|---|---|---|
| 分配时机 | 一次性预分配 | 每个线程运行时动态领取 |
| 线程同步 | 不需要同步 | 需要原子操作(如 fetch_add) |
| 开销 | 非常小 | 相对较高 |
| 适合场景 | 每次迭代时间大致相同 | 每次迭代时间不均,需负载均衡 |
| 数据结构 | 线程只读 work_share |
所有线程并发修改 work_share->next |
#pragma omp for schedule(static[, chunk])
            │
            ▼
   gomp_parallel_loop_start()
            │
            ▼
   gomp_loop_static_start()
       │
       ├── gomp_work_share_start()
       │     └── gomp_work_share_init()
       │
       ├── gomp_loop_init()            ← 初始化调度参数
       │
       └── gomp_iter_static_next()     ← 第一次获取迭代段
            │
            ▼
       后续每次调度也会继续调用 gomp_iter_static_next()
static中chunk的设置
gcc/libgomp/iter.c at 02a6f9a0df149bbc06e3bbb20be4dde199225296 · gcc-mirror/gcc
源码的注释已经很清晰了,大家可以看看
/* This function implements the STATIC scheduling method. The caller should iterate *pstart <= x < *pend. Return zero if there are more iterations to perform; nonzero if not. Return less than 0 if this thread had received the absolutely last iteration. */int gomp_iter_static_next (long *pstart, long *pend) { struct gomp_thread *thr = gomp_thread (); struct gomp_team *team = thr->ts.team; struct gomp_work_share *ws = thr->ts.work_share; unsigned long nthreads = team ? team->nthreads : 1;
if (thr->ts.static_trip == -1) return -1;
/* Quick test for degenerate teams and orphaned constructs. */ if (nthreads == 1) { *pstart = ws->next; *pend = ws->end; thr->ts.static_trip = -1; return ws->next == ws->end; }
/* We interpret chunk_size zero as “unspecified”, which means that we should break up the iterations such that each thread makes only one trip through the outer loop. */ if (ws->chunk_size == 0) { unsigned long n, q, i, t; unsigned long s0, e0; long s, e;
if (thr->ts.static_trip > 0) return 1; // 如果这里我们发现chunk_size是0,说明是静态调度,我们将手动计算每一个线程要做的工作 /* Compute the total number of iterations. */ s = ws->incr + (ws->incr > 0 ? -1 : 1); n = (ws->end - ws->next + s) / ws->incr; i = thr->ts.team_id; /* Compute the "zero-based" start and end points. That is, as if the loop began at zero and incremented by one. */ q = n / nthreads; t = n % nthreads; if (i < t) { t = 0; q++; } s0 = q * i + t; e0 = s0 + q; /* Notice when no iterations allocated for this thread. */ if (s0 >= e0) { thr->ts.static_trip = 1; return 1; } /* Transform these to the actual start and end numbers. */ s = (long)s0 * ws->incr + ws->next; e = (long)e0 * ws->incr + ws->next; *pstart = s; *pend = e; thr->ts.static_trip = (e0 == n ? -1 : 1); return 0; }else { unsigned long n, s0, e0, i, c; long s, e;
/* Otherwise, each thread gets exactly chunk_size iterations (if available) each time through the loop. */ s = ws->incr + (ws->incr > 0 ? -1 : 1); n = (ws->end - ws->next + s) / ws->incr; i = thr->ts.team_id; c = ws->chunk_size; /* Initial guess is a C sized chunk positioned nthreads iterations in, offset by our thread number. */ s0 = (thr->ts.static_trip * nthreads + i) * c; e0 = s0 + c; /* Detect overflow. */ if (s0 >= n) return 1; if (e0 > n) e0 = n; /* Transform these to the actual start and end numbers. */ s = (long)s0 * ws->incr + ws->next; e = (long)e0 * ws->incr + ws->next; *pstart = s; *pend = e; if (e0 == n) thr->ts.static_trip = -1; else thr->ts.static_trip++; return 0; }
}
这段函数 gomp_iter_static_next() 是 GCC OpenMP Runtime 中 static 调度策略(schedule(static))的核心实现,用于为当前线程分配它的下一段迭代区间([pstart, pend))。它是 #pragma omp for 中 schedule(static[, chunk_size]) 的具体执行逻辑。
计算当前线程(
thr->ts.team_id)在static策略下,应当处理哪一段迭代区间[pstart, pend)。
它内部根据 chunk_size 是否为 0(未指定)分为两种处理策略:
✅ 情况一:chunk_size == 0(用户没指定)
🧮 策略:每个线程平均分一次任务,不再参与调度
即:
#pragma omp for schedule(static) // 没写chunk_size每个线程只处理 一段连续的区间,不再往 work_share 里“多次领取任务”。分配逻辑如下:
🧾 步骤解释:
s = ws->incr + (ws->incr > 0 ? -1 : 1);
n = (ws->end - ws->next + s) / ws->incr;-
计算总的迭代次数
n。 -
让每个线程均分:
q = n / nthreads;,然后前面t个线程各多一个任务。 -
当前线程是
i = thr->ts.team_id,它就会得到从s0到e0的迭代。
最终再映射回真实循环起始值(不是从 0 开始):
s = (long)s0 * ws->incr + ws->next;
e = (long)e0 * ws->incr + ws->next;
✅ 情况二:chunk_size > 0(用户指定)
🧮 策略:每个线程每次从循环里“领一份 chunk”
即:
#pragma omp for schedule(static, 2)每个线程可能进入多次,每次拿 chunk_size 个迭代任务。OpenMP runtime 维护一个私有的 static_trip 表示第几次领取任务。
s0 = (thr->ts.static_trip * nthreads + i) * c;
e0 = s0 + c;
这个策略其实模拟一个全局静态分配的调度,只不过每个线程每次固定步长地从自己的起点继续领活。
| 阶段 | 函数 | 作用 |
|---|---|---|
| 初始化 loop | gomp_loop_static_start() |
每个线程第一次分配循环任务 |
| 初始化调度元数据 | gomp_loop_init() |
设置 start, end, incr, chunk_size 等 |
| 每次领任务 | gomp_iter_static_next() |
每个线程每次“领”一段 [start, end) 迭代 |
chunk_size的设置
gcc/libgomp/icv.c at 02a6f9a0df149bbc06e3bbb20be4dde199225296 · gcc-mirror/gcc
回归原始,我们最初的chunk_size是从icv->run_sched_chunk_size 传下来的。
而icv里确定的方式,依旧是根据调度方式确定:
void omp_set_schedule (omp_sched_t kind, int chunk_size)
{
  struct gomp_task_icv *icv = gomp_icv (true);
  switch (kind & ~omp_sched_monotonic)
    {
    case omp_sched_static:
      if (chunk_size < 1)
    chunk_size = 0;
      icv->run_sched_chunk_size = chunk_size;
      break;
    case omp_sched_dynamic:
    case omp_sched_guided:
      if (chunk_size < 1)
    chunk_size = 1;
      icv->run_sched_chunk_size = chunk_size;
      break;
    case omp_sched_auto:
      break;
    default:
      return;
    }
  icv->run_sched_var = kind;
}
启动线程
team_start我们上集也解析了,这集我们就不解析了。
If you need to cite this post
Haibin Lai. (June 2, 2025). “gcc是如何实现OpenMP parallel for的” [Blog post]. Retrieved from https://www.haibinlaiblog.top/posts/gcc%E6%98%AF%E5%A6%82%E4%BD%95%E5%AE%9E%E7%8E%B0openmp-parallel-for%E7%9A%84/
@online{lai-gcc-openmp-parallel-for-,
  title={gcc是如何实现OpenMP parallel for的},
  author={Haibin Lai},
  year={2025},
  url={https://www.haibinlaiblog.top/posts/gcc%E6%98%AF%E5%A6%82%E4%BD%95%E5%AE%9E%E7%8E%B0openmp-parallel-for%E7%9A%84/},
}